react源码分析
React源码目录
源码目录结构
源码中主要包括如下部分
- fixtures:为代码贡献者提供的测试React
- packages:主要部分,包含Scheduler,reconciler等
- scripts:react构建相关
下面来看下packages主要包含的模块
react:核心Api如:React.createElement、React.Component都在这
和平台相关render相关的文件夹:
react-art:如canvas svg的渲染 react-dom:浏览器环境 react-native-renderer:原生相关 react-noop-renderer:调试或者fiber用
试验性的包
react-server: ssr相关
react-fetch: 请求相关
react-interactions: 和事件如点击事件相关
react-reconciler: 构建节点
shared:包含公共方法和变量
辅助包:
react-is : 判断类型
react-client: 流相关
react-fetch: 数据请求相关
react-refresh: 热加载相关
scheduler:调度器相关
React-reconciler:在render阶段用它来构建fiber节点
怎样调试源码
本课程使用的react版本是17.0.1,通过下面几步就可以调试源码了,
方法一:可以用现成的包含本课程所有demo的项目来调试,建议使用已经构建好的项目,地址:https://github.com/xiaochen1024/react_source_demo
方法二:
- clone源码:
git clone https://github.com/facebook/react.git - 依赖安装:
npm installoryarn - build源码:npm run build react/index,react/jsx,react-dom/index,scheduler --type=NODE
为源码建立软链:
cd build/node_modules/react
npm link
cd build/node_modules/react-dom
npm link
create-react-app创建项目
npx create-react-app demo
npm link react react-dom
React源码架构
认识一下react源码架构和各个模块。
在真正的代码学习之前,我们需要在大脑中有一个react源码的地图,知道react渲染的大致流程和框架,这样才能从上帝视角看react是怎么更新的,来吧少年。
react的核心可以用ui=fn(state)来表示,更详细可以用
const state = reconcile(update);
const UI = commit(state);
上面的fn可以分为如下一个部分:
- Scheduler(调度器): 排序优先级,让优先级高的任务先进行reconcile
- Reconciler(协调器): 找出哪些节点发生了改变,并打上不同的Flags(旧版本react叫Tag)
- Renderer(渲染器): 将Reconciler中打好标签的节点渲染到视图上
一图胜千言:


jsx
jsx是js语言的扩展,react通过babel词法解析(具体怎么转换可以查阅babel相关插件),将jsx转换成React.createElement,React.createElement方法返回virtual-dom对象(内存中用来描述dom阶段的对象),所有jsx本质上就是React.createElement的语法糖,它能声明式的编写我们想要组件呈现出什么样的ui效果。
Fiber双缓存
Fiber对象上面保存了包括这个节点的属性、类型、dom等,Fiber通过child、sibling、return(指向父节点)来形成Fiber树,还保存了更新状态时用于计算state的updateQueue,updateQueue是一种链表结构,上面可能存在多个未计算的update,update也是一种数据结构,上面包含了更新的数据、优先级等,除了这些之外,上面还有和副作用有关的信息。
双缓存是指存在两颗Fiber树,current Fiber树描述了当前呈现的dom树,workInProgress Fiber是正在更新的Fiber树,这两颗Fiber树都是在内存中运行的,在workInProgress Fiber构建完成之后会将它作为current Fiber应用到dom上
在mount时(首次渲染),会根据jsx对象(Class Component或者的render函数 Function Component的返回值),构建Fiber对象,形成Fiber树,然后这颗Fiber树会作为current Fiber应用到真实dom上,在update(状态更新时如setState)的时候,会根据状态变更后的jsx对象和current Fiber做对比形成新的workInProgress Fiber,然后workInProgress Fiber切换成current Fiber应用到真实dom就达到了更新的目的,而这一切都是在内存中发生的,从而减少了对dom好性能的操作。
例如下面代码的Fiber双缓存结构如下,
function App() {
  const [count, setCount] = useState(0);
  return (
   <>
      <h1
    onClick={() => {
          // debugger;
          setCount(() => count + 1);
        }}
    >
 <p title={count}>{count}</p> xiaochen
      </h1>
    </>
  )
}

ReactDOM.render(<App />, document.getElementById("root"));

scheduler
Scheduler的作用是调度任务,react15没有Scheduler这部分,所以所有任务没有优先级,也不能中断,只能同步执行。
我们知道了要实现异步可中断的更新,需要浏览器指定一个时间,如果没有时间剩余了就需要暂停任务,requestIdleCallback貌似是个不错的选择,但是它存在兼容和触发不稳定的原因,react17中采用MessageChannel来实现。
//ReactFiberWorkLoop.old.js
function workLoopConcurrent() {
  while (workInProgress !== null && !shouldYield()) {//shouldYield判断是否暂停任务
    workInProgress = performUnitOfWork(workInProgress);
  }
}
在Scheduler中的每个任务的优先级使用过期时间表示的,如果一个任务的过期时间离现在很近,说明它马上就要过期了,优先级很高,如果过期时间很长,那它的优先级就低,没有过期的任务存放在timerQueue中,过期的任务存放在taskQueue中,timerQueue和timerQueue都是小顶堆,所以peek取出来的都是离现在时间最近也就是优先级最高的那个任务,然后优先执行它。

Lane模型
react之前的版本用expirationTime属性代表优先级,该优先级和IO不能很好的搭配工作(io的优先级高于cpu的优先级),现在有了更加细粒度的优先级表示方法Lane,Lane用二进制位表示优先级,二进制中的1表示位置,同一个二进制数可以有多个相同优先级的位,这就可以表示‘批’的概念,而且二进制方便计算。
这好比赛车比赛,在比赛开始的时候会分配一个赛道,比赛开始之后大家都会抢内圈的赛道(react中就是抢优先级高的Lane),比赛的尾声,最后一名赛车如果落后了很多,它也会跑到内圈的赛道,最后到达目的地(对应react中就是饥饿问题,低优先级的任务如果被高优先级的任务一直打断,到了它的过期时间,它也会变成高优先级)
Lane的二进制位如下,1的bits越多,优先级越低
//ReactFiberLane.js
export const NoLanes: Lanes = /*                        */ 0b0000000000000000000000000000000;
export const NoLane: Lane = /*                          */ 0b0000000000000000000000000000000;

export const SyncLane: Lane = /*                        */ 0b0000000000000000000000000000001;
export const SyncBatchedLane: Lane = /*                 */ 0b0000000000000000000000000000010;

export const InputDiscreteHydrationLane: Lane = /*      */ 0b0000000000000000000000000000100;
const InputDiscreteLanes: Lanes = /*                    */ 0b0000000000000000000000000011000;

const InputContinuousHydrationLane: Lane = /*           */ 0b0000000000000000000000000100000;
const InputContinuousLanes: Lanes = /*                  */ 0b0000000000000000000000011000000;

export const DefaultHydrationLane: Lane = /*            */ 0b0000000000000000000000100000000;
export const DefaultLanes: Lanes = /*                   */ 0b0000000000000000000111000000000;

const TransitionHydrationLane: Lane = /*                */ 0b0000000000000000001000000000000;
const TransitionLanes: Lanes = /*                       */ 0b0000000001111111110000000000000;

const RetryLanes: Lanes = /*                            */ 0b0000011110000000000000000000000;

export const SomeRetryLane: Lanes = /*                  */ 0b0000010000000000000000000000000;

export const SelectiveHydrationLane: Lane = /*          */ 0b0000100000000000000000000000000;

const NonIdleLanes = /*                                 */ 0b0000111111111111111111111111111;

export const IdleHydrationLane: Lane = /*               */ 0b0001000000000000000000000000000;
const IdleLanes: Lanes = /*                             */ 0b0110000000000000000000000000000;

export const OffscreenLane: Lane = /*                   */ 0b1000000000000000000000000000000;
reconciler (render phase)
Reconciler发生在render阶段,render阶段会分别为节点执行beginWork和completeWork(后面会讲),或者计算state,对比节点的差异,为节点赋值相应的effectFlags(对应dom节点的增删改)
协调器是在render阶段工作的,简单一句话概括就是Reconciler会创建或者更新Fiber节点。在mount的时候会根据jsx生成Fiber对象,在update的时候会根据最新的state形成的jsx对象和current Fiber树对比构建workInProgress Fiber树,这个对比的过程就是diff算法。
diff算法发生在render阶段的reconcileChildFibers函数中,diff算法分为单节点的diff和多节点的diff(例如一个节点中包含多个子节点就属于多节点的diff),单节点会根据节点的key和type,props等来判断节点是复用还是直接新创建节点,多节点diff会涉及节点的增删和节点位置的变化。
reconcile时会在这些Fiber上打上Flags标签,在commit阶段把这些标签应用到真实dom上,这些标签代表节点的增删改,如
//ReactFiberFlags.js
export const Placement = /*             */ 0b0000000000010;
export const Update = /*                */ 0b0000000000100;
export const PlacementAndUpdate = /*    */ 0b0000000000110;
export const Deletion = /*              */ 0b0000000001000;
render阶段遍历Fiber树类似dfs的过程,
‘捕获’阶段发生在beginWork函数中,该函数做的主要工作是创建Fiber节点,计算state和diff算法,
‘冒泡’阶段发生在completeWork中,该函数主要是做一些收尾工作,例如处理节点的props、和形成一条effectList的链表,该链表是被标记了更新的节点形成的链表
深度优先遍历过程如下,图中的数字是顺序,return指向父节点,第9章详细讲解
function App() {
  return (
   <>
      <h1>
        <p>count</p> xiaochen
      </h1>
    </>
  )
}

看如下代码
function App() {
  const [count, setCount] = useState(0);
  return (
    <>
      <h1
        onClick={() => {
          setCount(() => count + 1);
        }}
      >
        <p title={count}>{count}</p> xiaochen
      </h1>
    </>
  )
}
如果p和h1节点更新了则effectList如下,从rootFiber->h1->p,,顺便说下fiberRoot是整个项目的根节点,只存在一个,rootFiber是应用的根节点,可能存在多个,例如多个ReactDOM.render(<App />, document.getElementById("root"));创建多个应用节点

renderer(commit phase)
Renderer发生在commit阶段,commit阶段遍历effectList执行对应的dom操作或部分生命周期。
Renderer是在commit阶段工作的,commit阶段会遍历render阶段形成的effectList,并执行真实dom节点的操作和一些生命周期,不同平台对应的Renderer不同,例如浏览器对应的就是react-dom。
commit阶段发生在commitRoot函数中,该函数主要遍历effectList,分别用三个函数来处理effectList上的节点,这三个函数是commitBeforeMutationEffects、commitMutationEffects、commitLayoutEffects

concurrent
它是一类功能的合集(如fiber、schduler、lane、suspense),其目的是为了提高应用的响应速度,使应用cpu密集型的更新不在那么卡顿,其核心是实现了一套异步可中断、带优先级的更新。
我们知道一般浏览器的fps是60Hz,也就是每16.6ms会刷新一次,而js执行线程和GUI也就是浏览器的绘制是互斥的,因为js可以操作dom,影响最后呈现的结果,所以如果js执行的时间过长,会导致浏览器没时间绘制dom,造成卡顿。react17会在每一帧分配一个时间(时间片)给js执行,如果在这个时间内js还没执行完,那就要暂停它的执行,等下一帧继续执行,把执行权交回给浏览器去绘制。

对比下开启和未开启concurrent mode的区别,开启之后,构建Fiber的任务的执行不会一直处于阻塞状态,而是分成了一个个的task
未开启concurrent

开启concurrent

React设计理念
异步可中断
- React15慢在哪里
在讲这部分之前,需要讲是那些因素导致了react变慢,并且需要重构呢。
React15之前的协调过程是同步的,也叫stack reconciler,又因为js的执行是单线程的,这就导致了在更新比较耗时的任务时,不能及时响应一些高优先级的任务,比如用户的输入,所以页面就会卡顿,这就是cpu的限制。
- 解决方案
如何解决这个问题呢,试想一下,如果我们在日常的开发中,在单线程的环境中,遇到了比较耗时的代码计算会怎么做呢,首先我们可能会将任务分割,让它能够被中断,在其他任务到来的时候让出执行权,当其他任务执行后,再从之前中断的部分开始异步执行剩下的计算。所以关键是实现一套异步可中断的方案。
- 实现
在刚才的解决方案中提到了任务分割,和异步执行,并且能让出执行权,由此可以带出react中的三个概念
Fiber:react15的更新是同步的,因为它不能将任务分割,所以需要一套数据结构让它既能对应真实的dom又能作为分隔的单元,这就是Fiber。
let firstFiber
let nextFiber = firstFiber
let shouldYield = false
//firstFiber->firstChild->sibling
function performUnitOfWork(nextFiber){
  //...
  return nextFiber.next
}

function workLoop(deadline){
  while(nextFiber && !shouldYield){
          nextFiber = performUnitOfWork(nextFiber)
          shouldYield = deadline.timeReaming < 1
        }
  requestIdleCallback(workLoop)
}

requestIdleCallback(workLoop)Scheduler:有了Fiber,我们就需要用浏览器的时间片异步执行这些Fiber的工作单元,我们知道浏览器有一个api叫做requestIdleCallback,它可以在浏览器空闲的时候执行一些任务,我们用这个api执行react的更新,让高优先级的任务优先响应不就可以了吗,但事实是requestIdleCallback存在着浏览器的兼容性和触发不稳定的问题,所以我们需要用js实现一套时间片运行的机制,在react中这部分叫做scheduler。
Lane:有了异步调度,我们还需要细粒度的管理各个任务的优先级,让高优先级的任务优先执行,各个Fiber工作单元还能比较优先级,相同优先级的任务可以一起更新,想想是不是更cool呢。
产生出来的上层实现
由于有了这一套异步可中断的机制,我们就能实现batchedUpdates批量更新和Suspense
下面这两张图就是使用异步可中断更新前后的区别,可以体会一下


代数效应(Algebraic Effects)
除了cpu的瓶颈问题,还有一类问题是和副作用相关的问题,比如获取数据、文件操作等。不同设备性能和网络状况都不一样,react怎样去处理这些副作用,让我们在编码时最佳实践,运行应用时表现一致呢,这就需要react有分离副作用的能力,为什么要分离副作用呢,因为要解耦,这就是代数效应。
提问:我们都写过获取数据的代码,在获取数据前展示loading,数据获取之后取消loading,假设我们的设备性能和网络状况都很好,数据很快就获取到了,那我们还有必要在一开始的时候展示loading吗?如何才能有更好的用户体验呢?
看下下面这个例子
function getPrice(id) {
  return fetch(`xxx.com?id=${productId}`).then((res)=>{
    return res.price
  })
}

async function getTotalPirce(id1, id2) {
  const p1 = await getPrice(id1);
  const p2 = await getPrice(id2);

  return p1 + p2;
}

async function run(){
await getTotalPrice('001', '002');
}
getPrice是一个异步获取数据的方法,我们可以用async+await的方式获取数据,但是这会导致调用getTotalPrice的run方法也会变成异步函数,这就是async的传染性,所以没法分离副作用。
function getPrice(id) {
  const price = perform id;
  return price;
}

function getTotalPirce(id1, id2) {
  const p1 = getPrice(id1);
  const p2 = getPrice(id2);

  return p1 + p2;
}

try {
  getTotalPrice('001', '002');
} handle (productId) {
  fetch(`xxx.com?id=${productId}`).then((res)=>{
    resume with res.price
  })
}
现在改成下面这段代码,其中perform和handle是虚构的语法,当代码执行到perform的时候会暂停当前函数的执行,并且被handle捕获,handle函数体内会拿到productId参数获取数据之后resume价格price,resume会回到之前perform暂停的地方并且返回price,这就完全把副作用分离到了getTotalPirce和getPrice之外。
这里的关键流程是perform暂停函数的执行,handle获取函数执行权,resume交出函数执行权。
但是这些语法毕竟是虚构的,但是请看下下面的代码
function usePrice(id) {
  useEffect((id)=>{
      fetch(`xxx.com?id=${productId}`).then((res)=>{
        return res.price
  })
  }, [])
}

function TotalPirce({id1, id2}) {
  const p1 = usePrice(id1);
  const p2 = usePrice(id2);

  return <TotalPirce props={...}>
}
如果把getPrice换成usePrice,getTotalPirce换成TotalPirce组件,是不是有点熟悉呢,这就是hook分离副作用的能力。
我们知道generator也可以做到程序的暂停和恢复啊,那用generator不行就行了吗,但是generator暂停之后的恢复执行,还是得把执行权交换给直接调用者,调用者会沿着调用栈继续上交,所以也是有传染性的,并且generator不能计算优先级,排序优先级。
function getPrice(id) {
  return fetch(`xxx.com?id=${productId}`).then((res)=>{
    return res.price
  })
}

function* getTotalPirce(id1, id2) {
  const p1 = yield getPrice(id1);
  const p2 = yield getPrice(id2);

  return p1 + p2;
}

function* run(){
yield getTotalPrice('001', '002');
}
解耦副作用在函数式编程的实践中非常常见,例如redux-saga,将副作用从saga中分离,自己不处理副作用,只负责发起请求
function* fetchUser(action) {
   try {
      const user = yield call(Api.fetchUser, action.payload.userId);
      yield put({type: "USER_FETCH_SUCCEEDED", user: user});
   } catch (e) {
      yield put({type: "USER_FETCH_FAILED", message: e.message});
   }
}
严格意义上讲react是不支持Algebraic Effects的,但是react有Fiber啊,执行完这个Fiber的更新之后交还执行权给浏览器,让浏览器决定后面怎么调度,由此可见Fiber得是一个链表结构才能达到这样的效果,
Suspense也是这种概念的延伸,后面看到了具体的Suspense的源码就有些感觉了。先看个例子
const ProductResource = createResource(fetchProduct);

const Proeuct = (props) => {
    const p = ProductResource.read( // 用同步的方式来编写异步代码!
          props.id
    );
  return <h3>{p.price}</h3>;
}

function App() {
  return (
    <div>
      <Suspense fallback={<div>Loading...</div>}>
        <Proeuct id={123} />
      </Suspense>
    </div>
  );
}
可以看到ProductResource.read完全是同步的写法,把获取数据的部分完全分离出了Proeuct组件之外,在源码中,ProductResource.read会在获取数据之前会throw一个特殊的Promise,由于scheduler的存在,scheduler可以捕获这个promise,暂停更新,等数据获取之后交还执行权。ProductResource可以是localStorage甚至是redis、mysql等数据库,也就是组件即服务,可能以后会有server Component的出现。
jsx&核心api
virtual Dom是什么
一句话概括就是,用js对象表示dom信息和结构,更新时重新渲染更新后的对象对应的dom,这个对象就是React.createElement()的返回结果
virtual Dom是一种编程方式,它以对象的形式保存在内存中,它描述了我们dom的必要信息,并且用类似react-dom等模块与真实dom同步,这一过程也叫协调(reconciler),这种方式可以声明式的渲染相应的ui状态,让我们从dom操作中解放出来,在react中是以fiber树的形式存放组件树的相关信息,在更新时可以增量渲染相关dom,所以fiber也是virtual Dom实现的一部分
为什么要用virtual Dom
大量的dom操作慢,很小的更新都有可能引起页面的重新排列,js对象优于在内存中,处理起来更快,可以通过diff算法比较新老virtual Dom的差异,并且批量、异步、最小化的执行dom的变更,以提高性能
另外就是可以跨平台,jsx --> ReactElement对象 --> 真实节点,有中间层的存在,就可以在操作真实节点之前进行对应的处理,处理的结果反映到真实节点上,这个真实节点可以是浏览器环境,也可以是Native环境
virtual Dom真的快吗?其实virtual Dom只是在更新的时候快,在应用初始的时候不一定快

const div = document.createElement('div');
let str = ''
for(let k in div){
  str+=','+k
}
console.log(str)

jsx&createElement
jsx可以声明式的描述视图,提升开发效率,通过babel可以转换成React.createElement()的语法糖,也是js语法的扩展。
jsx是ClassComponent的render函数或者FunctionComponent的返回值,可以用来表示组件的内容,在经过babel编译之后,最后会被编译成React.createElement,这就是为什么jsx文件要声明import React from 'react'的原因(react17之后不用导入),你可以在 babel编译jsx 站点查看jsx被编译后的结果
React.createElement的源码中做了如下几件事
- 处理config,把除了保留属性外的其他config赋值给props
- 把children处理后赋值给props.children
- 处理defaultProps
- 调用ReactElement返回一个jsx对象(virtual-dom)
//ReactElement.js
export function createElement(type, config, children) {
  let propName;

  const props = {};

  let key = null;
  let ref = null;
  let self = null;
  let source = null;

  if (config != null) {
    //处理config,把除了保留属性外的其他config赋值给props
    //...
  }

  const childrenLength = arguments.length - 2;
  //把children处理后赋值给props.children
  //...

  //处理defaultProps
  //...

  return ReactElement(
    type,
    key,
    ref,
    self,
    source,
    ReactCurrentOwner.current,
    props,
  );
}

const ReactElement = function(type, key, ref, self, source, owner, props) {
  const element = {
    $$typeof: REACT_ELEMENT_TYPE,//表示是ReactElement类型

    type: type,//class或function
    key: key,//key
    ref: ref,//ref属性
    props: props,//props
    _owner: owner,
  };

  return element;
};
$$typeof表示的是组件的类型,例如在源码中有一个检查是否是合法Element的函数,就是根object.$$typeof === REACT_ELEMENT_TYPE来判断的
//ReactElement.js
export function isValidElement(object) {
  return (
    typeof object === 'object' &&
    object !== null &&
    object.$$typeof === REACT_ELEMENT_TYPE
  );
}
如果组件是ClassComponent则type是class本身,如果组件是FunctionComponent创建的,则type是这个function,源码中用ClassComponent.prototype.isReactComponent来区别二者。注意class或者function创建的组件一定要首字母大写,不然后被当成普通节点,type就是字符串。
jsx对象上没有优先级、状态、effectTag等标记,这些标记在Fiber对象上,在mount时Fiber根据jsx对象来构建,在update时根据最新状态的jsx和current Fiber对比,形成新的workInProgress Fiber,最后workInProgress Fiber切换成current Fiber。
render
//ReactDOMLegacy.js
export function render(
  element: React$Element<any>,//jsx对象
  container: Container,//挂载dom
  callback: ?Function,//回调
) {

  return legacyRenderSubtreeIntoContainer(
    null,
    element,
    container,
    false,
    callback,
  );
}
可以看到render所做的事也就是调用legacyRenderSubtreeIntoContainer,这个函数在下一章讲解,这里重点关注ReactDom.render()使用时候的三个参数。
component
//ReactBaseClasses.js
function Component(props, context, updater) {
  this.props = props;//props属性
  this.context = context;//当前的context
  this.refs = emptyObject;//ref挂载的对象
  this.updater = updater || ReactNoopUpdateQueue;//更新的对像
}

Component.prototype.isReactComponent = {};//表示是classComponent
component函数中主要在当前实例上挂载了props、context、refs、updater等,所以在组件的实例上能拿到这些,而更新主要的承载结构就是updater, 主要关注isReactComponent,它用来表示这个组件是类组件
总结:jsx是React.createElement的语法糖,jsx通过babel转化成React.createElement函数,React.createElement执行之后返回jsx对象,也叫virtual-dom,Fiber会根据jsx对象和current Fiber进行对比形成workInProgress Fiber
pureComponent也很简单,和component差不多,他会进行原型继承,然后赋值isPureReactComponent
function PureComponent(props, context, updater) {
  this.props = props;
  this.context = context;
  this.refs = emptyObject;
  this.updater = updater || ReactNoopUpdateQueue;
}

const pureComponentPrototype = (PureComponent.prototype = new ComponentDummy());
pureComponentPrototype.constructor = PureComponent;
Object.assign(pureComponentPrototype, Component.prototype);
pureComponentPrototype.isPureReactComponent = true;

export {Component, PureComponent};
legacy和concurrent模式入口函数
react启动的模式
react有3种模式进入主体函数的入口,我们可以从 react官方文档 使用 Concurrent 模式(实验性)中对比三种模式:
- legacy 模式:
ReactDOM.render(<App />, rootNode)。这是当前 React app 使用的方式。当前没有计划删除本模式,但是这个模式可能不支持这些新功能。 - blocking 模式:
ReactDOM.createBlockingRoot(rootNode).render(<App />)。目前正在实验中。作为迁移到 concurrent 模式的第一个步骤。 - concurrent 模式:
ReactDOM.createRoot(rootNode).render(<App />)。目前在实验中,未来稳定之后,打算作为 React 的默认开发模式。这个模式开启了所有的新功能。
特性对比:

legacy 模式在合成事件中有自动批处理的功能,但仅限于一个浏览器任务。非 React 事件想使用这个功能必须使用 unstable_batchedUpdates。在 blocking 模式和 concurrent 模式下,所有的 setState 在默认情况下都是批处理的。会在开发中发出警告
不同模式在react运行时的含义
legacy模式是我们常用的,它构建dom的过程是同步的,所以在render的reconciler中,如果diff的过程特别耗时,那么导致的结果就是js一直阻塞高优先级的任务(例如用户的点击事件),表现为页面的卡顿,无法响应。
concurrent Mode是react未来的模式,它用时间片调度实现了异步可中断的任务,根据设备性能的不同,时间片的长度也不一样,在每个时间片中,如果任务到了过期时间,就会主动让出线程给高优先级的任务。这部分将在 scheduler&lane模型 中解释。
两种模式函数主要执行过程
1.主要执行流程:

2.详细函数调用过程:
用demo_0跟着视频调试更加清晰,黄色部分是主要任务是创建fiberRootNode和rootFiber,红色部分是创建Update,蓝色部分是调度render阶段的入口函数

3.legacy模式:
render调用legacyRenderSubtreeIntoContainer,最后createRootImpl会调用到createFiberRoot创建fiberRootNode,然后调用createHostRootFiber创建rootFiber,其中fiberRootNode是整个项目的的根节点,rootFiber是当前应用挂在的节点,也就是ReactDOM.render调用后的根节点
//最上层的节点是整个项目的根节点fiberRootNode
ReactDOM.render(<App />, document.getElementById("root"));//rootFiber
ReactDOM.render(<App />, document.getElementById("root"));//rootFiber
创建完Fiber节点后,legacyRenderSubtreeIntoContainer调用updateContainer创建创建Update对象挂载到updateQueue的环形链表上,然后执行scheduleUpdateOnFiber调用performSyncWorkOnRoot进入render阶段和commit阶段
4.concurrent模式:
- createRoot调用createRootImpl创建fiberRootNode和rootNode
- 创建完Fiber节点后,调用ReactDOMRoot.prototype.render执行updateContainer,然后scheduleUpdateOnFiber异步调度performConcurrentWorkOnRoot进入render阶段和commit阶段
5.legacy模式主要函数注释
function legacyRenderSubtreeIntoContainer(parentComponent, children, container, forceHydrate, callback) {
  //...
  var root = container._reactRootContainer;
  var fiberRoot;

  if (!root) {
    // mount时
    root = container._reactRootContainer = legacyCreateRootFromDOMContainer(container, forceHydrate);//创建root节点
    fiberRoot = root._internalRoot;

    if (typeof callback === 'function') {//处理回调
      var originalCallback = callback;

      callback = function () {
        var instance = getPublicRootInstance(fiberRoot);
        originalCallback.call(instance);
      };
    }


    unbatchedUpdates(function () {
      updateContainer(children, fiberRoot, parentComponent, callback);//创建update入口
    });
  } else {
    // update时
    fiberRoot = root._internalRoot;

    if (typeof callback === 'function') {//处理回调
      var _originalCallback = callback;

      callback = function () {
        var instance = getPublicRootInstance(fiberRoot);

        _originalCallback.call(instance);
      };
    }

    updateContainer(children, fiberRoot, parentComponent, callback);
  }
}
function createFiberRoot(containerInfo, tag, hydrate, hydrationCallbacks) {
  var root = new FiberRootNode(containerInfo, tag, hydrate);//创建fiberRootNode
  const uninitializedFiber = createHostRootFiber(tag);//创建rootFiber
  //rootFiber和fiberRootNode连接
  root.current = uninitializedFiber;
  uninitializedFiber.stateNode = root;
  //创建updateQueue
  initializeUpdateQueue(uninitializedFiber);
  return root;
}

//对于HostRoot或者ClassComponent会使用initializeUpdateQueue创建updateQueue,然后将updateQueue挂载到fiber节点上
export function initializeUpdateQueue<State>(fiber: Fiber): void {
  const queue: UpdateQueue<State> = {
    baseState: fiber.memoizedState,//初始state,后面会基于这个state,根据Update计算新的state
    firstBaseUpdate: null,//Update形成的链表的头
    lastBaseUpdate: null,//Update形成的链表的尾
//新产生的update会以单向环状链表保存在shared.pending上,计算state的时候会剪开这个环状链表,并且连接在  //lastBaseUpdate后
    shared: {
      pending: null,
    },
    effects: null,
  };
  fiber.updateQueue = queue;
}
function updateContainer(element, container, parentComponent, callback) {
  var lane = requestUpdateLane(current$1);//获取当前可用lane 在12章讲解
  var update = createUpdate(eventTime, lane); //创建update

  update.payload = {
    element: element//jsx
  };

  enqueueUpdate(current$1, update);//update入队
  scheduleUpdateOnFiber(current$1, lane, eventTime);//调度update
  return lane;
}
function scheduleUpdateOnFiber(fiber, lane, eventTime) {
  if (lane === SyncLane) {//同步lane 对应legacy模式
    //...
    performSyncWorkOnRoot(root);//render阶段的起点 render在第6章讲解
  } else {//concurrent模式
    //...
    ensureRootIsScheduled(root, eventTime);//确保root被调度
  }
}
6.concurrent主要函数注释:
function ensureRootIsScheduled(root, currentTime) {
  //...
  var nextLanes = getNextLanes(root, root === workInProgressRoot ? workInProgressRootRenderLanes : NoLanes); //计算nextLanes

  //...

 //将lane的优先级转换成schduler的优先级
  var schedulerPriorityLevel = lanePriorityToSchedulerPriority(newCallbackPriority);
  //以schedulerPriorityLevel的优先级执行performConcurrentWorkOnRoot 也就是concurrent模式的起点
  newCallbackNode =   scheduleCallback(schedulerPriorityLevel,performConcurrentWorkOnRoot.bind(null, root));
}
7.两种模式的不同点:
- createRootImpl中传入的第二个参数不一样 一个是LegacyRoot一个是ConcurrentRoot
- requestUpdateLane中获取的lane的优先级不同
- 在函数scheduleUpdateOnFiber中根据不同优先级进入不同分支,legacy模式进入performSyncWorkOnRoot,concurrent模式会异步调度performConcurrentWorkOnRoot
Fiber架构
Fiber的深度理解
react15在render阶段的reconcile是不可打断的,这会在进行大量节点的reconcile时可能产生卡顿,因为浏览器所有的时间都交给了js执行,并且js的执行时单线程。为此react16之后就有了scheduler进行时间片的调度,给每个task(工作单元)一定的时间,如果在这个时间内没执行完,也要交出执行权给浏览器进行绘制和重排,所以异步可中断的更新需要一定的数据结构在内存中来保存工作单元的信息,这个数据结构就是Fiber。
那么有了Fiber这种数据结构后,能完成哪些事情呢,
- 工作单元 任务分解 :Fiber最重要的功能就是作为工作单元,保存原生节点或者组件节点对应信息(包括优先级),这些节点通过指针的形似形成Fiber树
- 增量渲染:通过jsx对象和current Fiber的对比,生成最小的差异补丁,应用到真实节点上
- 根据优先级暂停、继续、排列优先级:Fiber节点上保存了优先级,能通过不同节点优先级的对比,达到任务的暂停、继续、排列优先级等能力,也为上层实现批量更新、Suspense提供了基础
- 保存状态:因为Fiber能保存状态和更新的信息,所以就能实现函数组件的状态更新,也就是hooks
Fiber的数据结构
Fiber的自带的属性如下:
//ReactFiber.old.js
function FiberNode(
  tag: WorkTag,
  pendingProps: mixed,
  key: null | string,
  mode: TypeOfMode,
) {
  //作为静态的数据结构 保存节点的信息
  this.tag = tag;//对应组件的类型
  this.key = key;//key属性
  this.elementType = null;//元素类型
  this.type = null;//func或者class
  this.stateNode = null;//真实dom节点

  //作为fiber数架构 连接成fiber树
  this.return = null;//指向父节点
  this.child = null;//指向child
  this.sibling = null;//指向兄弟节点
  this.index = 0;

  this.ref = null;

  //用作为工作单元 来计算state
  this.pendingProps = pendingProps;
  this.memoizedProps = null;
  this.updateQueue = null;
  this.memoizedState = null;
  this.dependencies = null;

  this.mode = mode;

//effect相关
  this.effectTag = NoEffect;
  this.nextEffect = null;
  this.firstEffect = null;
  this.lastEffect = null;

  //优先级相关的属性
  this.lanes = NoLanes;
  this.childLanes = NoLanes;

  //current和workInProgress的指针
  this.alternate = null;
}
Fiber双缓存
现在我们知道了Fiber可以保存真实的dom,真实dom对应在内存中的Fiber节点会形成Fiber树,这颗Fiber树在react中叫current Fiber,也就是当前dom树对应的Fiber树,而正在构建Fiber树叫workInProgress Fiber,这两颗树的节点通过alternate相连.
function App() {
  return (
<>
      <h1>
        <p>count</p> xiaochen
      </h1>
    </>
  )
}

ReactDOM.render(<App />, document.getElementById("root"));

构建workInProgress Fiber发生在createWorkInProgress中,它能创建或者服用Fiber
//ReactFiber.old.js
export function createWorkInProgress(current: Fiber, pendingProps: any): Fiber {
  let workInProgress = current.alternate;
  if (workInProgress === null) {//区分是在mount时还是在update时
    workInProgress = createFiber(
      current.tag,
      pendingProps,
      current.key,
      current.mode,
    );
    workInProgress.elementType = current.elementType;
    workInProgress.type = current.type;
    workInProgress.stateNode = current.stateNode;

    workInProgress.alternate = current;
    current.alternate = workInProgress;
  } else {
    workInProgress.pendingProps = pendingProps;//复用属性
    workInProgress.type = current.type;
    workInProgress.flags = NoFlags;

    workInProgress.nextEffect = null;
    workInProgress.firstEffect = null;
    workInProgress.lastEffect = null;

    //...
  }

  workInProgress.childLanes = current.childLanes;//复用属性
  workInProgress.lanes = current.lanes;

  workInProgress.child = current.child;
  workInProgress.memoizedProps = current.memoizedProps;
  workInProgress.memoizedState = current.memoizedState;
  workInProgress.updateQueue = current.updateQueue;

  const currentDependencies = current.dependencies;
  workInProgress.dependencies =
    currentDependencies === null
      ? null
      : {
          lanes: currentDependencies.lanes,
          firstContext: currentDependencies.firstContext,
        };

  workInProgress.sibling = current.sibling;
  workInProgress.index = current.index;
  workInProgress.ref = current.ref;


  return workInProgress;
}
在mount时:会创建fiberRoot和rootFiber,然后根据jsx对象创建Fiber节点,节点连接成current Fiber树。

在update时:会根据新的状态形成的jsx(ClassComponent的render或者FuncComponent的返回值)和current Fiber对比形(diff算法)成一颗叫workInProgress的Fiber树,然后将fiberRoot的current指向workInProgress树,此时workInProgress就变成了current Fiber。fiberRoot:指整个应用的根节点,只存在一个
fiberRoot:指整个应用的根节点,只存在一个
rootFiber:ReactDOM.render或者ReactDOM.unstable_createRoot创建出来的应用的节点,可以存在多个。
我们现在知道了存在current Fiber和workInProgress Fiber两颗Fiber树,Fiber双缓存指的就是,在经过reconcile(diff)形成了新的workInProgress Fiber然后将workInProgress Fiber切换成current Fiber应用到真实dom中,存在双Fiber的好处是在内存中形成视图的描述,在最后应用到dom中,减少了对dom的操作。
现在来看看Fiber双缓存创建的过程图:
mount时:
刚开始只创建了fiberRoot和rootFiber两个节点

然后根据jsx创建workInProgress Fiber:

把workInProgress Fiber切换成current Fiber

update时
- 根据current Fiber创建workInProgress Fiber

- 把workInProgress Fiber切换成current Fiber
- 根据current Fiber创建workInProgress Fiber

render阶段
render阶段的入口
render阶段的主要工作是构建Fiber树和生成effectList,我们知道了react入口的两种模式会进入performSyncWorkOnRoot或者performConcurrentWorkOnRoot,而这两个方法分别会调用workLoopSync或者workLoopConcurrent
//ReactFiberWorkLoop.old.js
function workLoopSync() {
  while (workInProgress !== null) {
    performUnitOfWork(workInProgress);
  }
}

function workLoopConcurrent() {
  while (workInProgress !== null && !shouldYield()) {
    performUnitOfWork(workInProgress);
  }
}
这两函数的区别是判断条件是否存在shouldYield的执行,如果浏览器没有足够的时间,那么会终止while循环,也不会执行后面的performUnitOfWork函数,自然也不会执行后面的render阶段和commit阶段,这部分属于scheduler的知识点。
workInProgress:新创建的workInProgress fiber
performUnitOfWork:workInProgress fiber和会和已经创建的Fiber连接起来形成Fiber树。这个过程类似深度优先遍历,我们暂且称它们为‘捕获阶段’和‘冒泡阶段’。伪代码执行的过程大概如下
function performUnitOfWork(fiber) {
  if (fiber.child) {
    performUnitOfWork(fiber.child);//beginWork
  }

  if (fiber.sibling) {
    performUnitOfWork(fiber.sibling);//completeWork
  }
}
render阶段整体执行流程

捕获阶段 从根节点rootFiber开始,遍历到叶子节点,每次遍历到的节点都会执行beginWork,并且传入当前Fiber节点,然后创建或复用它的子Fiber节点,并赋值给workInProgress.child。
冒泡阶段 在捕获阶段遍历到子节点之后,会执行completeWork方法,执行完成之后会判断此节点的兄弟节点存不存在,如果存在就会为兄弟节点执行completeWork,当全部兄弟节点执行完之后,会向上‘冒泡’到父节点执行completeWork,直到rootFiber。
示例
function App() {
  return (
<>
      <h1>
        <p>count</p> xiaochen
      </h1>
    </>
  )
}

ReactDOM.render(<App />, document.getElementById("root"));
当执行完深度优先遍历之后形成的Fiber树:

图中的数字是遍历过程中的顺序,可以看到,遍历的过程中会从应用的根节点rootFiber开始,依次执行beginWork和completeWork,最后形成一颗Fiber树,每个节点以child和return相连。
注意:当遍历到只有一个子文本节点的Fiber时,该Fiber节点的子节点不会执行beginWork和completeWork,如图中的‘chen’文本节点。这是react的一种优化手段
beginWork
beginWork主要的工作是创建或复用子fiber节点
function beginWork(
  current: Fiber | null,//当前存在于dom树中对应的Fiber树
  workInProgress: Fiber,//正在构建的Fiber树
  renderLanes: Lanes,//第12章在讲
): Fiber | null {
 // 1.update时满足条件即可复用current fiber进入bailoutOnAlreadyFinishedWork函数
  if (current !== null) {
    const oldProps = current.memoizedProps;
    const newProps = workInProgress.pendingProps;
    if (
      oldProps !== newProps ||
      hasLegacyContextChanged() ||
      (__DEV__ ? workInProgress.type !== current.type : false)
    ) {
      didReceiveUpdate = true;
    } else if (!includesSomeLane(renderLanes, updateLanes)) {
      didReceiveUpdate = false;
      switch (workInProgress.tag) {
        // ...
      }
      return bailoutOnAlreadyFinishedWork(
        current,
        workInProgress,
        renderLanes,
      );
    } else {
      didReceiveUpdate = false;
    }
  } else {
    didReceiveUpdate = false;
  }

  //2.根据tag来创建不同的fiber 最后进入reconcileChildren函数
  switch (workInProgress.tag) {
    case IndeterminateComponent:
      // ...
    case LazyComponent:
      // ...
    case FunctionComponent:
      // ...
    case ClassComponent:
      // ...
    case HostRoot:
      // ...
    case HostComponent:
      // ...
    case HostText:
      // ...
  }
}
从代码中可以看到参数中有current Fiber,也就是当前真实dom对应的Fiber树,在之前介绍Fiber双缓存机制中,我们知道在首次渲染时除了rootFiber外,current 等于 null,因为首次渲染dom还没构建出来,在update时current不等于 null,因为update时dom树已经存在了,所以beginWork函数中用current === null来判断是mount还是update进入不同的逻辑
- mount:根据fiber.tag进入不同fiber的创建函数,最后都会调用到reconcileChildren创建子Fiber
- update:在构建workInProgress的时候,当满足条件时,会复用current Fiber来进行优化,也就是进入bailoutOnAlreadyFinishedWork的逻辑,能复用didReceiveUpdate变量是false,复用的条件是
- oldProps ==
= newProps && workInProgress.type === current.type 属性和fiber的type不变 - !includesSomeLane(renderLanes, updateLanes) 更新的优先级是否足够,第15章讲解
- oldProps ==
reconcileChildren/mountChildFibers
创建子fiber的过程会进入reconcileChildren,该函数的作用是为workInProgress fiber节点生成它的child fiber即 workInProgress.child。然后继续深度优先遍历它的子节点执行相同的操作。
//ReactFiberBeginWork.old.js
export function reconcileChildren(
  current: Fiber | null,
  workInProgress: Fiber,
  nextChildren: any,
  renderLanes: Lanes
) {
  if (current === null) {
    //mount时
    workInProgress.child = mountChildFibers(
      workInProgress,
      null,
      nextChildren,
      renderLanes,
    );
  } else {
    //update
    workInProgress.child = reconcileChildFibers(
      workInProgress,
      current.child,
      nextChildren,
      renderLanes,
    );
  }
}
reconcileChildren会区分mount和update两种情况,进入reconcileChildFibers或mountChildFibers,reconcileChildFibers和mountChildFibers最终其实就是ChildReconciler传递不同的参数返回的函数,这个参数用来表示是否追踪副作用,在ChildReconciler中用shouldTrackSideEffects来判断是否为对应的节点打上effectTag,例如如果一个节点需要进行插入操作,需要满足两个条件:
fiber.stateNode!==null 即fiber存在真实dom,真实dom保存在stateNode上
(fiber.effectTag & Placement) !== 0 fiber存在Placement的effectTag
var reconcileChildFibers = ChildReconciler(true);
var mountChildFibers = ChildReconciler(false);
function ChildReconciler(shouldTrackSideEffects) {
function placeChild(newFiber, lastPlacedIndex, newIndex) {
newFiber.index = newIndex;
if (!shouldTrackSideEffects) {//是否追踪副作用
// Noop.
return lastPlacedIndex;
}
var current = newFiber.alternate;
if (current !== null) {
var oldIndex = current.index;
if (oldIndex < lastPlacedIndex) {
// This is a move.
newFiber.flags = Placement;
return lastPlacedIndex;
} else {
// This item can stay in place.
return oldIndex;
}
} else {
// This is an insertion.
newFiber.flags = Placement;
return lastPlacedIndex;
}
}
}
在之前心智模型的介绍中,我们知道为Fiber打上effectTag之后在commit阶段会被执行对应dom的增删改,而且在reconcileChildren的时候,rootFiber是存在alternate的,即rootFiber存在对应的current Fiber,所以rootFiber会走reconcileChildFibers的逻辑,所以shouldTrackSideEffects等于true会追踪副作用,最后为rootFiber打上Placement的effectTag,然后将dom一次性插入,提高性能。
export const NoFlags = /*                      */ 0b0000000000000000000;
// 插入dom
export const Placement = /*                */ 0b00000000000010;
在源码的ReactFiberFlags.js文件中,用二进制位运算来判断是否存在Placement,例如让var a = NoFlags,如果需要在a上增加Placement的effectTag,就只要 effectTag | Placement就可以了

bailoutOnAlreadyFinishedWork
//ReactFiberBeginWork.old.js
function bailoutOnAlreadyFinishedWork(current, workInProgress, renderLanes) {

  //...
if (!includesSomeLane(renderLanes, workInProgress.childLanes)) {

    return null;

  } else {

    cloneChildFibers(current, workInProgress);

    return workInProgress.child;

  }
}
如果进入了bailoutOnAlreadyFinishedWork复用的逻辑,会判断优先级第12章介绍,优先级足够则进入cloneChildFibers否则返回null
completeWork
completeWork主要工作是处理fiber的props、创建dom、创建effectList
//ReactFiberCompleteWork.old.js
function completeWork(
  current: Fiber | null,
  workInProgress: Fiber,
  renderLanes: Lanes,
): Fiber | null {
  const newProps = workInProgress.pendingProps;

//根据workInProgress.tag进入不同逻辑,这里我们关注HostComponent,HostComponent,其他类型之后在讲
  switch (workInProgress.tag) {
    case IndeterminateComponent:
    case LazyComponent:
    case SimpleMemoComponent:
    case HostRoot:
   //...

    case HostComponent: {
      popHostContext(workInProgress);
      const rootContainerInstance = getRootHostContainer();
      const type = workInProgress.type;

      if (current !== null && workInProgress.stateNode != null) {
        // update时
       updateHostComponent(
          current,
          workInProgress,
          type,
          newProps,
          rootContainerInstance,
        );
      } else {
        // mount时
        const currentHostContext = getHostContext();
        // 创建fiber对应的dom节点
        const instance = createInstance(
            type,
            newProps,
            rootContainerInstance,
            currentHostContext,
            workInProgress,
          );
        // 将后代dom节点插入刚创建的dom里
        appendAllChildren(instance, workInProgress, false, false);
        // dom节点赋值给fiber.stateNode
        workInProgress.stateNode = instance;

        // 处理props和updateHostComponent类似
        if (
          finalizeInitialChildren(
            instance,
            type,
            newProps,
            rootContainerInstance,
            currentHostContext,
          )
        ) {
          markUpdate(workInProgress);
        }
     }
      return null;
    }
从简化版的completeWork中可以看到,这个函数做了一下几件事
- 根据workInProgress.tag进入不同函数,我们以HostComponent举例
- update时(除了判断
current===null外还需要判断workInProgress.stateNode===null),调用updateHostComponent处理props(包括onClick、style、children ...),并将处理好的props赋值给updatePayload,最后会保存在workInProgress.updateQueue上 - mount时 调用createInstance创建dom,将后代dom节点插入刚创建的dom中,调用finalizeInitialChildren处理props(和updateHostComponent处理的逻辑类似)
之前我们有说到在beginWork的mount时,rootFiber存在对应的current,所以他会执行mountChildFibers打上Placement的effectTag,在冒泡阶段也就是执行completeWork时,我们将子孙节点通过appendAllChildren挂载到新创建的dom节点上,最后就可以一次性将内存中的节点用dom原生方法反应到真实dom中。
在beginWork 中我们知道有的节点被打上了effectTag的标记,有的没有,而在commit阶段时要遍历所有包含effectTag的Fiber来执行对应的增删改,那我们还需要从Fiber树中找到这些带effectTag的节点嘛,答案是不需要的,这里是以空间换时间,在执行completeWork的时候遇到了带effectTag的节点,会将这个节点加入一个叫effectList中,所以在commit阶段只要遍历effectList就可以了(rootFiber.firstEffect.nextEffect就可以访问带effectTag的Fiber了)
effectList的指针操作发生在completeUnitOfWork函数中,例如我们的应用是这样的
function App() {

  const [count, setCount] = useState(0);

  return (

    <>
      <h1
        onClick={() => {
          setCount(() => count + 1);
        }}
      >
        <p title={count}>{count}</p> xiaochen
      </h1>
    </>
  )

}
那么我们的操作effectList指针如下(这张图是操作指针过程中的图,此时遍历到了app Fiber节点,当遍历到rootFiber时,h1,p节点会和rootFiber形成环状链表)

rootFiber.firstEffect===h1

rootFiber.firstEffect.next===p
形成环状链表的时候会从触发更新的节点向上合并effectList直到rootFiber,这一过程发生在completeUnitOfWork函数中,整个函数的作用就是向上合并effectList
//ReactFiberWorkLoop.old.js
function completeUnitOfWork(unitOfWork: Fiber): void {
  let completedWork = unitOfWork;
  do {
    //...

      if (
        returnFiber !== null &&
        (returnFiber.flags & Incomplete) === NoFlags
      ) {
        if (returnFiber.firstEffect === null) {
          returnFiber.firstEffect = completedWork.firstEffect;//父节点的effectList头指针指向completedWork的effectList头指针
        }
        if (completedWork.lastEffect !== null) {
          if (returnFiber.lastEffect !== null) {
            //父节点的effectList头尾指针指向completedWork的effectList头指针
            returnFiber.lastEffect.nextEffect = completedWork.firstEffect;
          }
          //父节点头的effectList尾指针指向completedWork的effectList尾指针
          returnFiber.lastEffect = completedWork.lastEffect;
        }

        const flags = completedWork.flags;
        if (flags > PerformedWork) {
          if (returnFiber.lastEffect !== null) {
            //completedWork本身追加到returnFiber的effectList结尾
            returnFiber.lastEffect.nextEffect = completedWork;
          } else {
            //returnFiber的effectList头节点指向completedWork
            returnFiber.firstEffect = completedWork;
          }
          //returnFiber的effectList尾节点指向completedWork
          returnFiber.lastEffect = completedWork;
        }
      }
    } else {

      //...

      if (returnFiber !== null) {
        returnFiber.firstEffect = returnFiber.lastEffect = null;//重制effectList
        returnFiber.flags |= Incomplete;
      }
    }

  } while (completedWork !== null);

//...
}
最后生成的fiber树如下

然后commitRoot(root);进入commit阶段
diff算法
在render阶段更新Fiber节点时,我们会调用reconcileChildFibers对比current Fiber和jsx对象构建workInProgress Fiber,这里current Fiber是指当前dom对应的fiber树,jsx是class组件render方法或者函数组件的返回值。
在reconcileChildFibers中会根据newChild的类型来进入单节点的diff或者多节点diff
//ReactChildFiber.old.js
function reconcileChildFibers(
  returnFiber: Fiber,
  currentFirstChild: Fiber | null,
  newChild: any,
): Fiber | null {

  const isObject = typeof newChild === 'object' && newChild !== null;

  if (isObject) {
    switch (newChild.$$typeof) {
      case REACT_ELEMENT_TYPE:
//单一节点diff
        return placeSingleChild(
            reconcileSingleElement(
              returnFiber,
              currentFirstChild,
              newChild,
              lanes,
            ),
          );
    }
  }
//...

  if (isArray(newChild)) {
     //多节点diff
    return reconcileChildrenArray(
        returnFiber,
        currentFirstChild,
        newChild,
        lanes,
      );
  }

  // 删除节点
  return deleteRemainingChildren(returnFiber, currentFirstChild);
}
diff过程的主要流程如下图:

我们知道对比两颗树的复杂度本身是O(n3),对我们的应用来说这个是不能承受的量级,react为了降低复杂度,提出了三个前提:
只对同级比较,跨层级的dom不会进行复用
不同类型节点生成的dom树不同,此时会直接销毁老节点及子孙节点,并新建节点
可以通过key来对元素diff的过程提供复用的线索,例如:
const a = (
    <>
      <p key="0">0</p>
      <p key="1">1</p>
    </>
  );
const b = (
  <>
    <p key="1">1</p>
    <p key="0">0</p>
  </>
);如果a和b里的元素都没有key,因为节点的更新前后文本节点不同,导致他们都不能复用,所以会销毁之前的节点,并新建节点,但是现在有key了,b中的节点会在老的a中寻找key相同的节点尝试复用,最后发现只是交换位置就可以完成更新,具体对比过程后面会讲到。
单节点diff
单点diff有如下几种情况:
- key和type相同表示可以复用节点
- key不同直接标记删除节点,然后新建节点
- key相同type不同,标记删除该节点和兄弟节点,然后新创建节点
function reconcileSingleElement(
  returnFiber: Fiber,
  currentFirstChild: Fiber | null,
  element: ReactElement
): Fiber {
  const key = element.key;
  let child = currentFirstChild;

  //child节点不为null执行对比
  while (child !== null) {

    // 1.比较key
    if (child.key === key) {

      // 2.比较type

      switch (child.tag) {
        //...

        default: {
          if (child.elementType === element.type) {
            // type相同则可以复用 返回复用的节点
            return existing;
          }
          // type不同跳出
          break;
        }
      }
      //key相同,type不同则把fiber及和兄弟fiber标记删除
      deleteRemainingChildren(returnFiber, child);
      break;
    } else {
      //key不同直接标记删除该节点
      deleteChild(returnFiber, child);
    }
    child = child.sibling;
  }

  //新建新Fiber
}
多节点diff
多节点diff比较复杂,我们分三种情况进行讨论,其中a表示更新前的节点,b表示更新后的节点
属性变化
const a = (
    <>
      <p key="0" name='0'>0</p>
      <p key="1">1</p>
    </>
  );
  const b = (
    <>
      <p key="0" name='00'>0</p>
      <p key="1">1</p>
    </>
  );
type变化
const a = (
    <>
      <p key="0">0</p>
      <p key="1">1</p>
    </>
  );
  const b = (
    <>
      <div key="0">0</div>
      <p key="1">1</p>
    </>
  );
新增节点
const a = (
    <>
      <p key="0">0</p>
      <p key="1">1</p>
    </>
  );
  const b = (
    <>
      <p key="0">0</p>
      <p key="1">1</p>
      <p key="2">2</p>
    </>
  );
节点删除
const a = (
    <>
      <p key="0">0</p>
      <p key="1">1</p>
      <p key="2">2</p>
    </>
  );
  const b = (
    <>
      <p key="0">0</p>
      <p key="1">1</p>
    </>
  );
节点位置变化
const a = (
    <>
      <p key="0">0</p>
      <p key="1">1</p>
    </>
  );
  const b = (
    <>
      <p key="1">1</p>
      <p key="0">0</p>
    </>
  );
在源码中多节点diff有三个for循环遍历(并不意味着所有更新都有经历三个遍历,进入循环体有条件,也有条件跳出循环),第一个遍历处理节点的更新(包括props更新和type更新和删除),第二个遍历处理其他的情况(节点新增),其原因在于在大多数的应用中,节点更新的频率更加频繁,第三个处理节点位置改变
第一次遍历 因为老的节点存在于current Fiber中,所以它是个链表结构,还记得Fiber双缓存结构嘛,节点通过child、return、sibling连接,而newChildren存在于jsx当中,所以遍历对比的时候,首先让
newChildren[i]oldFiber对比,然后让i++、nextOldFiber = oldFiber.sibling。在第一轮遍历中,会处理三种情况,其中第1,2两种情况会结束第一次循环key不同,第一次循环结束
newChildren或者oldFiber遍历完,第一次循环结束
key同type不同,标记oldFiber为DELETION
key相同type相同则可以复用
newChildren遍历完,oldFiber没遍历完,在第一次遍历完成之后将oldFiber中没遍历完的节点标记为DELETION,即删除的DELETION Tag
第二个遍历 第二个遍历考虑三种情况
newChildren和oldFiber都遍历完:多节点diff过程结束
newChildren没遍历完,oldFiber遍历完,将剩下的newChildren的节点标记为Placement,即插入的Tag
newChildren和oldFiber没遍历完,则进入节点移动的逻辑
第三个遍历 主要逻辑在placeChild函数中,例如更新前节点顺序是ABCD,更新后是ACDB
newChild中第一个位置的A和oldFiber第一个位置的A,key相同可复用,lastPlacedIndex=0
newChild中第二个位置的C和oldFiber第二个位置的B,key不同跳出第一次循环,将oldFiber中的BCD保存在map中
newChild中第二个位置的C在oldFiber中的index=2 > lastPlacedIndex=0不需要移动,lastPlacedIndex=2
newChild中第三个位置的D在oldFiber中的index=3 > lastPlacedIndex=2不需要移动,lastPlacedIndex=3
newChild中第四个位置的B在oldFiber中的index=1 < lastPlacedIndex=3,移动到最后
看图更直观

例如更新前节点顺序是ABCD,更新后是DABC
newChild中第一个位置的D和oldFiber第一个位置的A,key不相同不可复用,将oldFiber中的ABCD保存在map中,lastPlacedIndex=0
newChild中第一个位置的D在oldFiber中的index=3 > lastPlacedIndex=0不需要移动,lastPlacedIndex=3
3.  newChild中第二个位置的A在oldFiber中的index=0 < lastPlacedIndex=3,移动到最后
4.  newChild中第三个位置的B在oldFiber中的index=1 < lastPlacedIndex=3,移动到最后
5.  newChild中第四个位置的C在oldFiber中的index=2 < lastPlacedIndex=3,移动到最后
看图更直观

代码如下:
//ReactChildFiber.old.js

function placeChild(newFiber, lastPlacedIndex, newIndex) {
       newFiber.index = newIndex;

       if (!shouldTrackSideEffects) {
         return lastPlacedIndex;
       }

    var current = newFiber.alternate;

       if (current !== null) {
         var oldIndex = current.index;

         if (oldIndex < lastPlacedIndex) {
           //oldIndex小于lastPlacedIndex的位置 则将节点插入到最后
           newFiber.flags = Placement;
           return lastPlacedIndex;
         } else {
           return oldIndex;//不需要移动 lastPlacedIndex = oldIndex;
         }
       } else {
         //新增插入
         newFiber.flags = Placement;
         return lastPlacedIndex;
       }
     }
//ReactChildFiber.old.js

function reconcileChildrenArray(
    returnFiber: Fiber,//父fiber节点
    currentFirstChild: Fiber | null,//childs中第一个节点
    newChildren: Array<*>,//新节点数组 也就是jsx数组
    lanes: Lanes,//lane相关 第12章介绍
  ): Fiber | null {

    let resultingFirstChild: Fiber | null = null;//diff之后返回的第一个节点
    let previousNewFiber: Fiber | null = null;//新节点中上次对比过的节点

    let oldFiber = currentFirstChild;//正在对比的oldFiber
    let lastPlacedIndex = 0;//上次可复用的节点位置 或者oldFiber的位置
    let newIdx = 0;//新节点中对比到了的位置
    let nextOldFiber = null;//正在对比的oldFiber
    for (; oldFiber !== null && newIdx < newChildren.length; newIdx++) {//第一次遍历
      if (oldFiber.index > newIdx) {//nextOldFiber赋值
        nextOldFiber = oldFiber;
        oldFiber = null;
      } else {
        nextOldFiber = oldFiber.sibling;
      }
      const newFiber = updateSlot(//更新节点,如果key不同则newFiber=null
        returnFiber,
        oldFiber,
        newChildren[newIdx],
        lanes,
      );
      if (newFiber === null) {
        if (oldFiber === null) {
          oldFiber = nextOldFiber;
        }
        break;//跳出第一次遍历
      }
      if (shouldTrackSideEffects) {//检查shouldTrackSideEffects
        if (oldFiber && newFiber.alternate === null) {
          deleteChild(returnFiber, oldFiber);
        }
      }
      lastPlacedIndex = placeChild(newFiber, lastPlacedIndex, newIdx);//标记节点插入
      if (previousNewFiber === null) {
        resultingFirstChild = newFiber;
      } else {
        previousNewFiber.sibling = newFiber;
      }
      previousNewFiber = newFiber;
      oldFiber = nextOldFiber;
    }

    if (newIdx === newChildren.length) {
      deleteRemainingChildren(returnFiber, oldFiber);//将oldFiber中没遍历完的节点标记为DELETION
      return resultingFirstChild;
    }

    if (oldFiber === null) {
      for (; newIdx < newChildren.length; newIdx++) {//第2次遍历
        const newFiber = createChild(returnFiber, newChildren[newIdx], lanes);
        if (newFiber === null) {
          continue;
        }
        lastPlacedIndex = placeChild(newFiber, lastPlacedIndex, newIdx);//插入新增节点
        if (previousNewFiber === null) {
          resultingFirstChild = newFiber;
        } else {
          previousNewFiber.sibling = newFiber;
        }
        previousNewFiber = newFiber;
      }
      return resultingFirstChild;
    }

    // 将剩下的oldFiber加入map中
    const existingChildren = mapRemainingChildren(returnFiber, oldFiber);

    for (; newIdx < newChildren.length; newIdx++) {//第三次循环 处理节点移动
      const newFiber = updateFromMap(
        existingChildren,
        returnFiber,
        newIdx,
        newChildren[newIdx],
        lanes,
      );
      if (newFiber !== null) {
        if (shouldTrackSideEffects) {
          if (newFiber.alternate !== null) {
            existingChildren.delete(//删除找到的节点
              newFiber.key === null ? newIdx : newFiber.key,
            );
          }
        }
        lastPlacedIndex = placeChild(newFiber, lastPlacedIndex, newIdx);//标记为插入的逻辑
        if (previousNewFiber === null) {
          resultingFirstChild = newFiber;
        } else {
          previousNewFiber.sibling = newFiber;
        }
        previousNewFiber = newFiber;
      }
    }

    if (shouldTrackSideEffects) {
      //删除existingChildren中剩下的节点
      existingChildren.forEach(child => deleteChild(returnFiber, child));
    }

    return resultingFirstChild;
  }
commit阶段
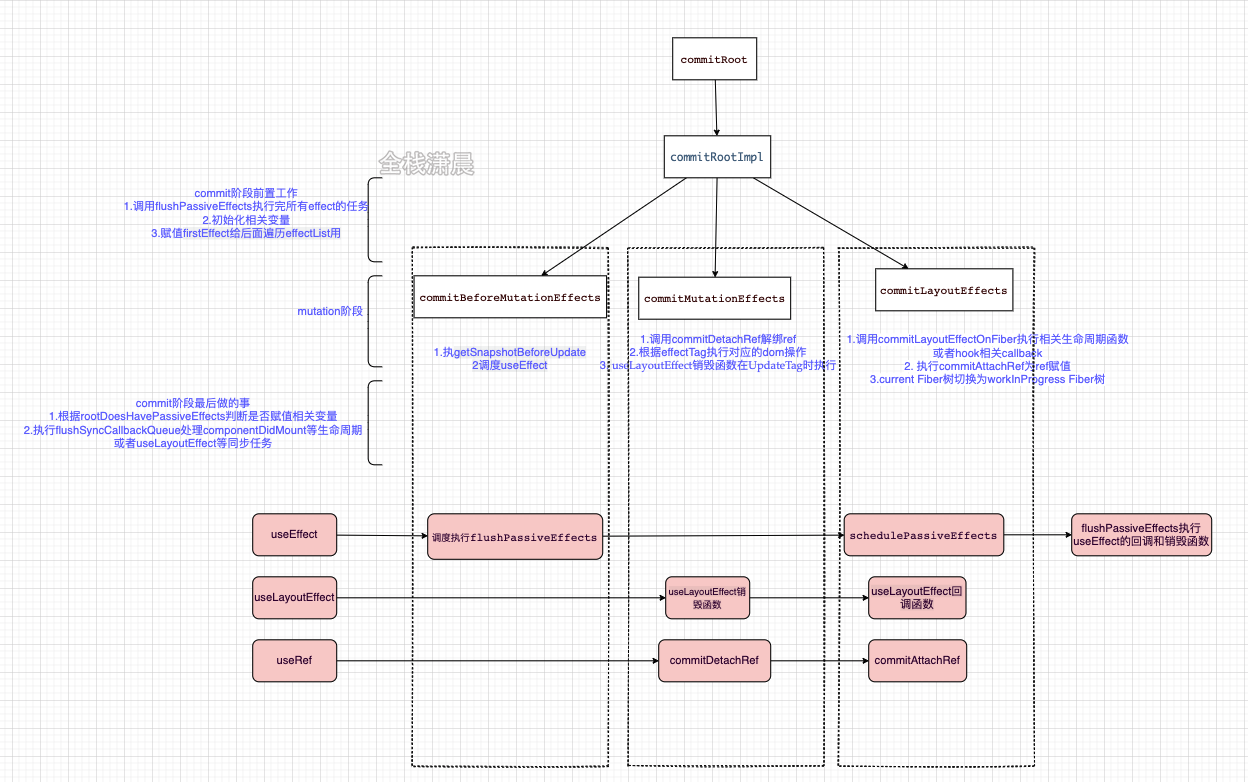
在render阶段的末尾会调用commitRoot(root);进入commit阶段,这里的root指的就是fiberRoot,然后会遍历render阶段生成的effectList,effectList上的Fiber节点保存着对应的props变化。之后会遍历effectList进行对应的dom操作和生命周期、hooks回调或销毁函数,各个函数做的事情如下
在commitRoot函数中其实是调度了commitRootImpl函数
//ReactFiberWorkLoop.old.js
function commitRoot(root) {
  var renderPriorityLevel = getCurrentPriorityLevel();
  runWithPriority$1(ImmediatePriority$1, commitRootImpl.bind(null, root, renderPriorityLevel));
  return null;
}
在commitRootImpl的函数中主要分三个部分:
commit阶段前置工作
调用flushPassiveEffects执行完所有effect的任务
初始化相关变量
赋值firstEffect给后面遍历effectList用
//ReactFiberWorkLoop.old.js
do {
    // 调用flushPassiveEffects执行完所有effect的任务
    flushPassiveEffects();
  } while (rootWithPendingPassiveEffects !== null);

    //...

  // 重置变量 finishedWork指rooFiber
  root.finishedWork = null;
    //重置优先级
  root.finishedLanes = NoLanes;

  // Scheduler回调函数重置
  root.callbackNode = null;
  root.callbackId = NoLanes;

  // 重置全局变量
  if (root === workInProgressRoot) {
    workInProgressRoot = null;
    workInProgress = null;
    workInProgressRootRenderLanes = NoLanes;
  } else {
  }

    //rootFiber可能会有新的副作用 将它也加入到effectLis
  let firstEffect;
  if (finishedWork.effectTag > PerformedWork) {
    if (finishedWork.lastEffect !== null) {
      finishedWork.lastEffect.nextEffect = finishedWork;
      firstEffect = finishedWork.firstEffect;
    } else {
      firstEffect = finishedWork;
    }
  } else {
    firstEffect = finishedWork.firstEffect;
  }
mutation阶段
遍历effectList分别执行三个方法commitBeforeMutationEffects、commitMutationEffects、commitLayoutEffects执行对应的dom操作和生命周期
在介绍双缓存Fiber树的时候,我们在构建完workInProgress Fiber树之后会将fiberRoot的current指向workInProgress Fiber,让workInProgress Fiber成为current,这个步骤发生在commitMutationEffects函数执行之后,commitLayoutEffects之前,因为componentWillUnmount发生在commitMutationEffects函数中,这时还可以获取之前的Update,而componentDidMount
和componentDidUpdate会在commitLayoutEffects中执行,这时已经可以获取更新后的真实dom了function commitRootImpl(root, renderPriorityLevel) {
//...
do {
//...
commitBeforeMutationEffects();
} while (nextEffect !== null);
do {
//...
commitMutationEffects(root, renderPriorityLevel);//commitMutationEffects
} while (nextEffect !== null);
root.current = finishedWork;//切换current Fiber树
do {
//...
commitLayoutEffects(root, lanes);//commitLayoutEffects
} while (nextEffect !== null);
//...
}mutation 后
根据rootDoesHavePassiveEffects赋值相关变量
执行flushSyncCallbackQueue处理componentDidMount等生命周期或者useLayoutEffect等同步任务
const rootDidHavePassiveEffects = rootDoesHavePassiveEffects;

// 根据rootDoesHavePassiveEffects赋值相关变量
if (rootDoesHavePassiveEffects) {
  rootDoesHavePassiveEffects = false;
  rootWithPendingPassiveEffects = root;
  pendingPassiveEffectsLanes = lanes;
  pendingPassiveEffectsRenderPriority = renderPriorityLevel;
} else {}
//...

// 确保被调度
ensureRootIsScheduled(root, now());

// ...

// 执行flushSyncCallbackQueue处理componentDidMount等生命周期或者useLayoutEffect等同步任务
flushSyncCallbackQueue();

return null;
现在让我们来看看mutation阶段的三个函数分别做了什么事情
commitBeforeMutationEffects 该函数主要做了如下两件事
执行getSnapshotBeforeUpdate 在源码中commitBeforeMutationEffectOnFiber对应的函数是commitBeforeMutationLifeCycles在该函数中会调用getSnapshotBeforeUpdate,现在我们知道了getSnapshotBeforeUpdate是在mutation阶段中的commitBeforeMutationEffect函数中执行的,而commit阶段是同步的,所以getSnapshotBeforeUpdate也同步执行
function commitBeforeMutationLifeCycles(
  current: Fiber | null,
  finishedWork: Fiber,
): void {
  switch (finishedWork.tag) {
        //...
    case ClassComponent: {
      if const instance = finishedWork.stateNode;
          const snapshot = instance.getSnapshotBeforeUpdate(//getSnapshotBeforeUpdate
            finishedWork.elementType === finishedWork.type
              ? prevProps
              : resolveDefaultProps(finishedWork.type, prevProps),
            prevState,
          );
        }
}
调度useEffect
在flushPassiveEffects函数中调用flushPassiveEffectsImpl遍历pendingPassiveHookEffectsUnmount和pendingPassiveHookEffectsMount,执行对应的effect回调和销毁函数,而这两个数组是在commitLayoutEffects函数中赋值的(待会就会讲到),mutation后effectList赋值给rootWithPendingPassiveEffects,然后scheduleCallback调度执行flushPassiveEffects
function flushPassiveEffectsImpl() {
  if (rootWithPendingPassiveEffects === null) {//在mutation后变成了root
    return false;
  }
  const unmountEffects = pendingPassiveHookEffectsUnmount;
  pendingPassiveHookEffectsUnmount = [];//useEffect的回调函数
  for (let i = 0; i < unmountEffects.length; i += 2) {
    const effect = ((unmountEffects[i]: any): HookEffect);
    //...
    const destroy = effect.destroy;
    destroy();
  }

  const mountEffects = pendingPassiveHookEffectsMount;//useEffect的销毁函数
  pendingPassiveHookEffectsMount = [];
  for (let i = 0; i < mountEffects.length; i += 2) {
    const effect = ((unmountEffects[i]: any): HookEffect);
    //...
    const create = effect.create;
    effect.destroy = create();
  }
}
componentDidUpdate或componentDidMount会在commit阶段同步执行(这个后面会讲到),而useEffect会在commit阶段异步调度,所以适用于数据请求等副作用的处理
注意,和在render阶段的fiber node会打上Placement等标签一样,useEffect或useLayoutEffect也有对应的effect Tag,在源码中对应export const Passive = /* */ 0b0000000001000000000;
function commitBeforeMutationEffects() {
  while (nextEffect !== null) {
    const current = nextEffect.alternate;
    const effectTag = nextEffect.effectTag;

    // 在commitBeforeMutationEffectOnFiber函数中会执行getSnapshotBeforeUpdate
    if ((effectTag & Snapshot) !== NoEffect) {
      commitBeforeMutationEffectOnFiber(current, nextEffect);
    }

    // scheduleCallback调度useEffect
    if ((effectTag & Passive) !== NoEffect) {
      if (!rootDoesHavePassiveEffects) {
        rootDoesHavePassiveEffects = true;
        scheduleCallback(NormalSchedulerPriority, () => {
          flushPassiveEffects();
          return null;
        });
      }
    }
    nextEffect = nextEffect.nextEffect;//遍历effectList
  }
}
commitMutationEffects commitMutationEffects主要做了如下几件事
调用commitDetachRef解绑ref(第11章hook会讲解)
根据effectTag执行对应的dom操作
useLayoutEffect销毁函数在UpdateTag时执行
function commitMutationEffects(root: FiberRoot, renderPriorityLevel) {
  //遍历effectList
  while (nextEffect !== null) {

    const effectTag = nextEffect.effectTag;
    // 调用commitDetachRef解绑ref
    if (effectTag & Ref) {
      const current = nextEffect.alternate;
      if (current !== null) {
        commitDetachRef(current);
      }
    }

    // 根据effectTag执行对应的dom操作
    const primaryEffectTag =
      effectTag & (Placement | Update | Deletion | Hydrating);
    switch (primaryEffectTag) {
      // 插入dom
      case Placement: {
        commitPlacement(nextEffect);
        nextEffect.effectTag &= ~Placement;
        break;
      }
      // 插入更新dom
      case PlacementAndUpdate: {
        // 插入
        commitPlacement(nextEffect);
        nextEffect.effectTag &= ~Placement;
        // 更新
        const current = nextEffect.alternate;
        commitWork(current, nextEffect);
        break;
      }
        //...
      // 更新dom
      case Update: {
        const current = nextEffect.alternate;
        commitWork(current, nextEffect);
        break;
      }
      // 删除dom
      case Deletion: {
        commitDeletion(root, nextEffect, renderPriorityLevel);
        break;
      }
    }

    nextEffect = nextEffect.nextEffect;
  }
}
现在让我们来看看操作dom的这几个函数
commitPlacement插入节点:
简化后的代码很清晰,找到该节点最近的parent节点和兄弟节点,然后根据isContainer来判断是插入到兄弟节点前还是append到parent节点后
unction commitPlacement(finishedWork: Fiber): void {
    //...
  const parentFiber = getHostParentFiber(finishedWork);//找到最近的parent

  let parent;
  let isContainer;
  const parentStateNode = parentFiber.stateNode;
  switch (parentFiber.tag) {
    case HostComponent:
      parent = parentStateNode;
      isContainer = false;
      break;
    //...

  }
  const before = getHostSibling(finishedWork);//找兄弟节点
  if (isContainer) {
    insertOrAppendPlacementNodeIntoContainer(finishedWork, before, parent);
  } else {
    insertOrAppendPlacementNode(finishedWork, before, parent);
  }
}
commitWork更新节点:
在简化后的源码中可以看到
如果fiber的tag是SimpleMemoComponent会调用commitHookEffectListUnmount执行对应的hook的销毁函数,可以看到传入的参数是HookLayout | HookHasEffect,也就是说执行useLayoutEffect的销毁函数。
如果是HostComponent,那么调用commitUpdate,commitUpdate最后会调用updateDOMProperties处理对应Update的dom操作
function commitWork(current: Fiber | null, finishedWork: Fiber): void {
  if (!supportsMutation) {
    switch (finishedWork.tag) {
       //...
      case SimpleMemoComponent: {
        commitHookEffectListUnmount(HookLayout | HookHasEffect, finishedWork);
      }
     //...
    }
  }

  switch (finishedWork.tag) {
    //...
    case HostComponent: {
      //...
      commitUpdate(
            instance,
            updatePayload,
            type,
            oldProps,
            newProps,
            finishedWork,
          );
      }
      return;
    }
}
function updateDOMProperties(
domElement: Element,
updatePayload: Array<any>,
wasCustomComponentTag: boolean,
isCustomComponentTag: boolean,
): void {
// TODO: Handle wasCustomComponentTag
for (let i = 0; i < updatePayload.length; i += 2) {
const propKey = updatePayload[i];
const propValue = updatePayload[i + 1];
if (propKey === STYLE) {
setValueForStyles(domElement, propValue);
} else if (propKey === DANGEROUSLY_SET_INNER_HTML) {
setInnerHTML(domElement, propValue);
} else if (propKey === CHILDREN) {
setTextContent(domElement, propValue);
} else {
setValueForProperty(domElement, propKey, propValue, isCustomComponentTag);
}
}
}
commitDeletion删除节点: 如果是ClassComponent会执行componentWillUnmount,删除fiber,如果是FunctionComponent 会删除ref、并执行useEffect的销毁函数,具体可在源码中查看unmountHostComponents、commitNestedUnmounts、detachFiberMutation这几个函数
function commitDeletion(
  finishedRoot: FiberRoot,
  current: Fiber,
  renderPriorityLevel: ReactPriorityLevel,
): void {
  if (supportsMutation) {
    // Recursively delete all host nodes from the parent.
    // Detach refs and call componentWillUnmount() on the whole subtree.
    unmountHostComponents(finishedRoot, current, renderPriorityLevel);
  } else {
    // Detach refs and call componentWillUnmount() on the whole subtree.
    commitNestedUnmounts(finishedRoot, current, renderPriorityLevel);
  }
  const alternate = current.alternate;
  detachFiberMutation(current);
  if (alternate !== null) {
    detachFiberMutation(alternate);
  }
}
commitLayoutEffects 在commitMutationEffects之后所有的dom操作都已经完成,可以访问dom了,commitLayoutEffects主要做了
调用commitLayoutEffectOnFiber执行相关生命周期函数或者hook相关callback
执行commitAttachRef为ref赋值
function commitLayoutEffects(root: FiberRoot, committedLanes: Lanes) {
  while (nextEffect !== null) {
    const effectTag = nextEffect.effectTag;

    // 调用commitLayoutEffectOnFiber执行生命周期和hook
    if (effectTag & (Update | Callback)) {
      const current = nextEffect.alternate;
      commitLayoutEffectOnFiber(root, current, nextEffect, committedLanes);
    }

    // ref赋值
    if (effectTag & Ref) {
      commitAttachRef(nextEffect);
    }

    nextEffect = nextEffect.nextEffect;
  }
}
commitLayoutEffectOnFiber:
在源码中commitLayoutEffectOnFiber函数的别名是commitLifeCycles,在简化后的代码中可以看到,commitLifeCycles会判断fiber的类型,SimpleMemoComponent会执行useLayoutEffect的回调,然后调度useEffect,ClassComponent会执行componentDidMount或者componentDidUpdate,this.setState第二个参数也会执行,HostRoot会执行ReactDOM.render函数的第三个参数,例如
ReactDOM.render(<App />, document.querySelector("#root"), function() {
  console.log("root mount");
});
现在可以知道useLayoutEffect是在commit阶段同步执行,useEffect会在commit阶段异步调度
function commitLifeCycles(
  finishedRoot: FiberRoot,
  current: Fiber | null,
  finishedWork: Fiber,
  committedLanes: Lanes,
): void {
  switch (finishedWork.tag) {
    case SimpleMemoComponent: {
      // 此函数会调用useLayoutEffect的回调
      commitHookEffectListMount(HookLayout | HookHasEffect, finishedWork);
      // 向pendingPassiveHookEffectsUnmount和pendingPassiveHookEffectsMount中push effect                       // 并且调度它们
      schedulePassiveEffects(finishedWork);
    }
    case ClassComponent: {
      //条件判断...
      instance.componentDidMount();
      //条件判断...
      instance.componentDidUpdate(//update 在layout期间同步执行
        prevProps,
        prevState,
        instance.__reactInternalSnapshotBeforeUpdate,
      );
    }


    case HostRoot: {
      commitUpdateQueue(finishedWork, updateQueue, instance);//render第三个参数
    }

  }
}
在schedulePassiveEffects中会将useEffect的销毁和回调函数push到pendingPassiveHookEffectsUnmount和pendingPassiveHookEffectsMount中
function schedulePassiveEffects(finishedWork: Fiber) {
  const updateQueue: FunctionComponentUpdateQueue | null = (finishedWork.updateQueue: any);
  const lastEffect = updateQueue !== null ? updateQueue.lastEffect : null;
  if (lastEffect !== null) {
    const firstEffect = lastEffect.next;
    let effect = firstEffect;
    do {
      const {next, tag} = effect;
      if (
        (tag & HookPassive) !== NoHookEffect &&
        (tag & HookHasEffect) !== NoHookEffect
      ) {
        //push useEffect的销毁函数并且加入调度
        enqueuePendingPassiveHookEffectUnmount(finishedWork, effect);
        //push useEffect的回调函数并且加入调度
        enqueuePendingPassiveHookEffectMount(finishedWork, effect);
      }
      effect = next;
    } while (effect !== firstEffect);
  }
}
commitAttachRef:
commitAttachRef中会判断ref的类型,执行ref或者给ref.current赋值
function commitAttachRef(finishedWork: Fiber) {
  const ref = finishedWork.ref;
  if (ref !== null) {
    const instance = finishedWork.stateNode;

    let instanceToUse;
    switch (finishedWork.tag) {
      case HostComponent:
        instanceToUse = getPublicInstance(instance);
        break;
      default:
        instanceToUse = instance;
    }

    if (typeof ref === "function") {
      // 执行ref回调
      ref(instanceToUse);
    } else {
      // 如果是值的类型则赋值给ref.current
      ref.current = instanceToUse;
    }
  }
}
生命周期调用顺序
各阶段生命周期执行情况
函数组件hooks的周期会在hooks章节讲解,这一章的使命周期主要针对类组件,各阶段生命周期执行情况看下图:
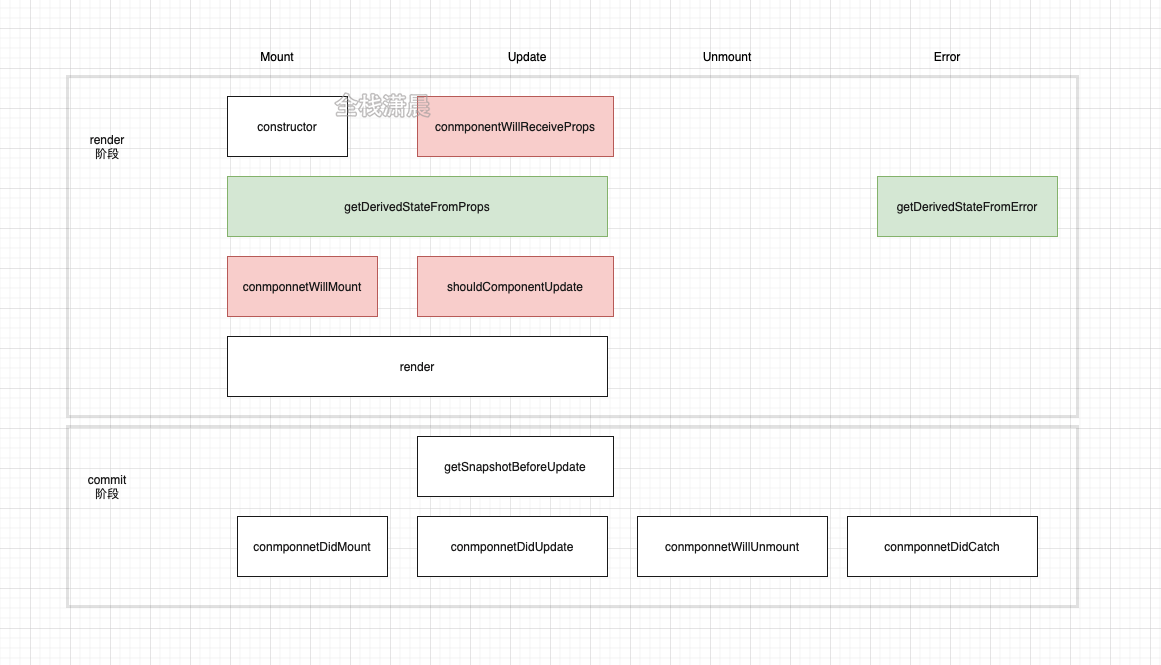
- render阶段:
- mount时:组件首先会经历constructor、getDerivedStateFromProps、componnetWillMount、render
- update时:组件首先会经历componentWillReceiveProps、getDerivedStateFromProps、shouldComponentUpdate、render
- error时:会调用getDerivedStateFromError
- commit阶段
- mount时:组件会经历componnetDidMount
- update时:组件会调用getSnapshotBeforeUpdate、componnetDidUpdate
- unMount时:调用componnetWillUnmount
- error时:调用componnetDidCatch
其中红色的部分不建议使用,需要注意的是commit阶段生命周期在mutation各个子阶段的执行顺序,可以复习上一章
接下来根据一个例子来讲解在mount时和update时更新的具体顺序:
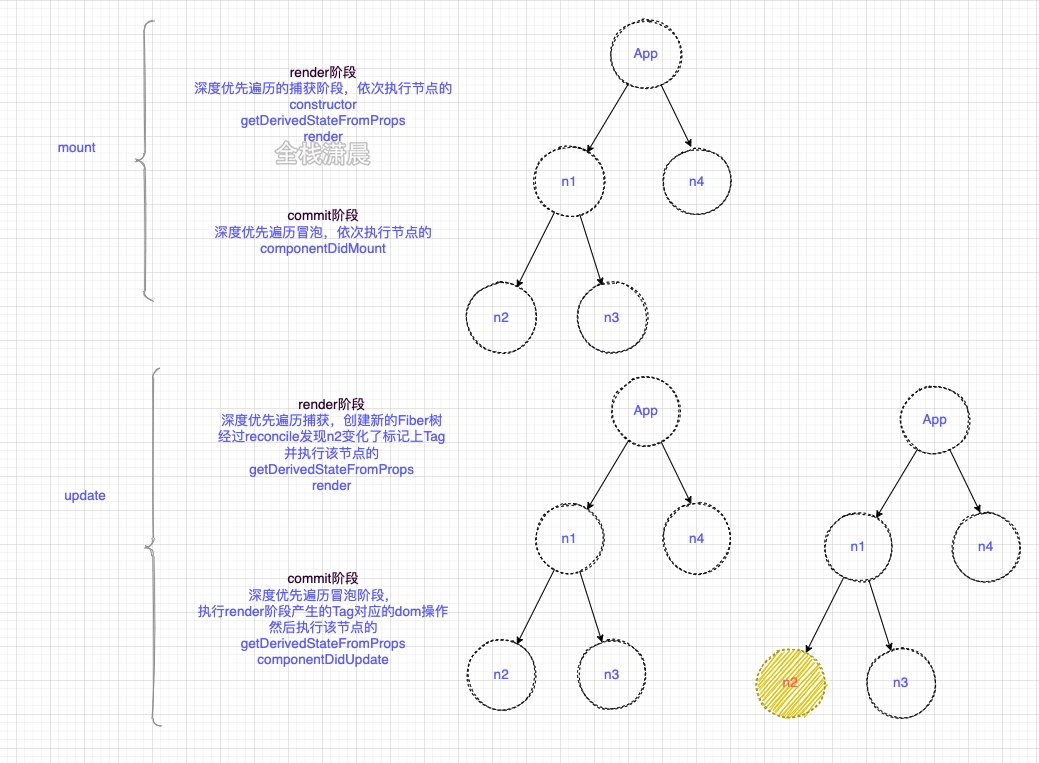
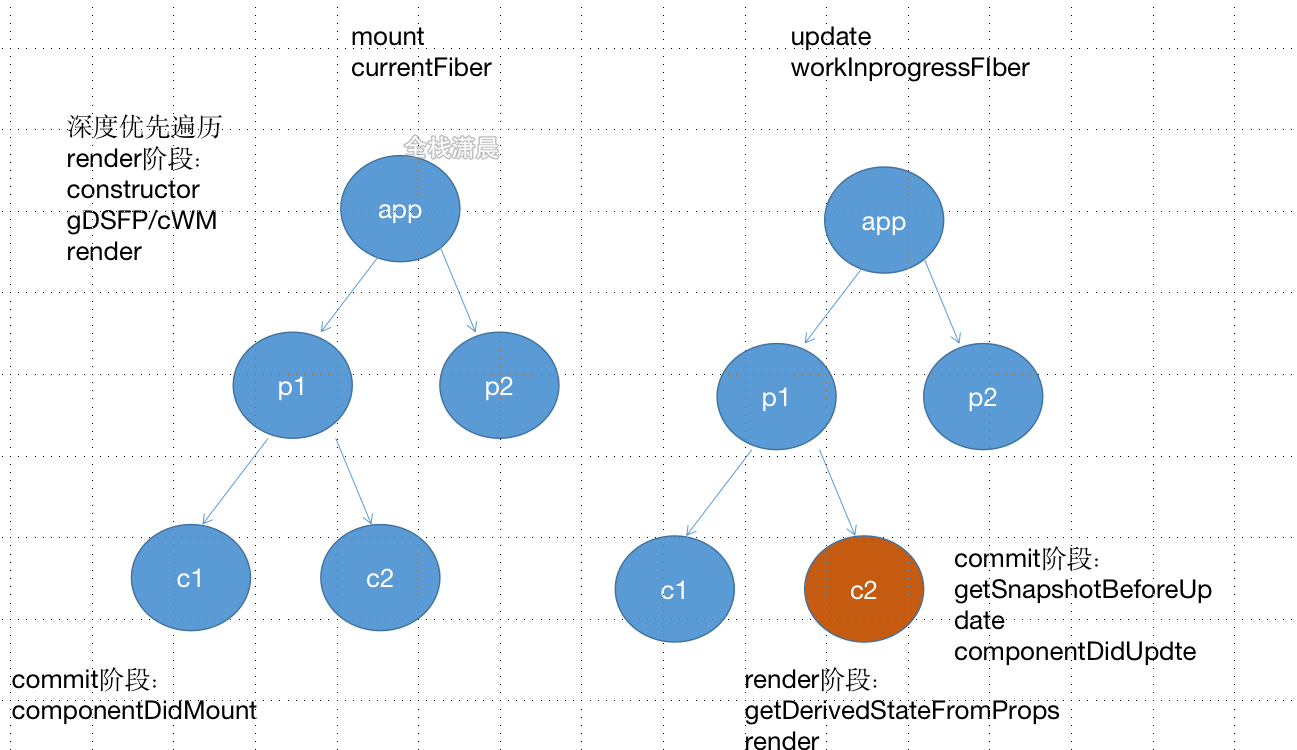
- mount时:首先会按照深度优先的方式,依次构建wip Fiber节点然后切换成current Fiber,在render阶段会依次执行各个节点的constructor、getDerivedStateFromProps/componnetWillMount、render,在commit阶段,也就是深度优先遍历向上冒泡的时候依次执行节点的componnetDidMount
- update时:同样会深度优先构建wip Fiber树,在构建的过程中会diff子节点,在render阶段,如果返现有节点的变化,例如上图的c2,那就标记这个节点Update Flag,然后执行getDerivedStateFromProps和render,在commit阶段会依次执行节点的getSnapshotBeforeUpdate、componnetDidUpdate
状态更新流程
setState&forceUpdate
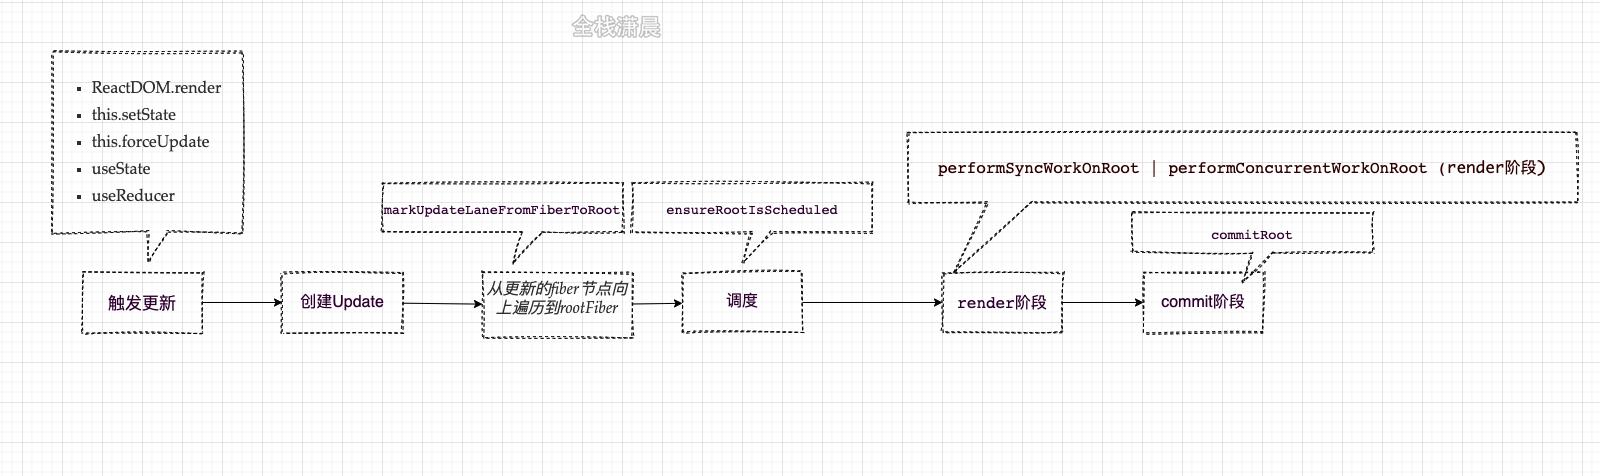
在react中触发状态更新的几种方式:
- ReactDOM.render
- this.setState
- this.forceUpdate
- useState
- useReducer
我们重点看下重点看下this.setState和this.forceUpdate,hook在第13章讲
this.setState内调用this.updater.enqueueSetState,主要是将update加入updateQueue中
//ReactBaseClasses.js
Component.prototype.setState = function (partialState, callback) {
  if (!(typeof partialState === 'object' || typeof partialState === 'function' || partialState == null)) {
    {
      throw Error( "setState(...): takes an object of state variables to update or a function which returns an object of state variables." );
    }
  }
  this.updater.enqueueSetState(this, partialState, callback, 'setState');
};
//ReactFiberClassComponent.old.js
enqueueSetState(inst, payload, callback) {
  const fiber = getInstance(inst);//fiber实例

  const eventTime = requestEventTime();
  const suspenseConfig = requestCurrentSuspenseConfig();

  const lane = requestUpdateLane(fiber, suspenseConfig);//优先级

  const update = createUpdate(eventTime, lane, suspenseConfig);//创建update

  update.payload = payload;

  if (callback !== undefined && callback !== null) {  //赋值回调
    update.callback = callback;
  }

  enqueueUpdate(fiber, update);//update加入updateQueue
  scheduleUpdateOnFiber(fiber, lane, eventTime);//调度update
}
enqueueUpdate用来将update加入updateQueue队列
//ReactUpdateQueue.old.js
export function enqueueUpdate<State>(fiber: Fiber, update: Update<State>) {
  const updateQueue = fiber.updateQueue;
  if (updateQueue === null) {
    return;
  }

  const sharedQueue: SharedQueue<State> = (updateQueue: any).shared;
  const pending = sharedQueue.pending;
  if (pending === null) {
    update.next = update;//与自己形成环状链表
  } else {
    update.next = pending.next;//加入链表的结尾
    pending.next = update;
  }
  sharedQueue.pending = update;
}
this.forceUpdate和this.setState一样,只是会让tag赋值ForceUpdate
//ReactBaseClasses.js
Component.prototype.forceUpdate = function(callback) {
  this.updater.enqueueForceUpdate(this, callback, 'forceUpdate');
};
//ReactFiberClassComponent.old.js
enqueueForceUpdate(inst, callback) {
    const fiber = getInstance(inst);
    const eventTime = requestEventTime();
    const suspenseConfig = requestCurrentSuspenseConfig();
    const lane = requestUpdateLane(fiber, suspenseConfig);

    const update = createUpdate(eventTime, lane, suspenseConfig);

    //tag赋值ForceUpdate
    update.tag = ForceUpdate;

    if (callback !== undefined && callback !== null) {
      update.callback = callback;
    }

    enqueueUpdate(fiber, update);
    scheduleUpdateOnFiber(fiber, lane, eventTime);

  },
};
如果标记ForceUpdate,render阶段组件更新会根据checkHasForceUpdateAfterProcessing,和checkShouldComponentUpdate来判断,如果Update的tag是ForceUpdate,则checkHasForceUpdateAfterProcessing为true,当组件是PureComponent时,checkShouldComponentUpdate会浅比较state和props,所以当使用this.forceUpdate一定会更新
//ReactFiberClassComponent.old.js
const shouldUpdate =
  checkHasForceUpdateAfterProcessing() ||
  checkShouldComponentUpdate(
    workInProgress,
    ctor,
    oldProps,
    newProps,
    oldState,
    newState,
    nextContext,
  );
状态更新整体流程
Update&updateQueue
HostRoot或者ClassComponent触发更新后,会在函数createUpdate中创建update,并在后面的render阶段的beginWork中计算Update。FunctionComponent对应的Update在第11章讲,它和HostRoot或者ClassComponent的Update结构有些不一样
//ReactUpdateQueue.old.js
export function createUpdate(eventTime: number, lane: Lane): Update<*> {//创建update
  const update: Update<*> = {
    eventTime,
    lane,

    tag: UpdateState,
    payload: null,
    callback: null,

    next: null,
  };
  return update;
}
我们主要关注这些参数:
- lane:优先级(第12章讲)
- tag:更新的类型,例如UpdateState、ReplaceState
- payload:ClassComponent的payload是setState第一个参数,HostRoot的payload是ReactDOM.render的第一个参数
- callback:setState的第二个参数
- next:连接下一个Update形成一个链表,例如同时触发多个setState时会形成多个Update,然后用next 连接
对于HostRoot或者ClassComponent会在mount的时候使用initializeUpdateQueue创建updateQueue,然后将updateQueue挂载到fiber节点上
//ReactUpdateQueue.old.js
export function initializeUpdateQueue<State>(fiber: Fiber): void {
  const queue: UpdateQueue<State> = {
    baseState: fiber.memoizedState,
    firstBaseUpdate: null,
    lastBaseUpdate: null,
  shared: {
      pending: null,
    },
    effects: null,
  };
fiber.updateQueue = queue;
}
- baseState:初始state,后面会基于这个state,根据Update计算新的state
- firstBaseUpdate、lastBaseUpdate:Update形成的链表的头和尾
- shared.pending:新产生的update会以单向环状链表保存在shared.pending上,计算state的时候会剪开这个环状链表,并且链接在lastBaseUpdate后
- effects:calback不为null的update
从触发更新的fiber节点向上遍历到rootFiber
在markUpdateLaneFromFiberToRoot函数中会从触发更新的节点开始向上遍历到rootFiber,遍历的过程会处理节点的优先级(第15章讲)
//ReactFiberWorkLoop.old.js
function markUpdateLaneFromFiberToRoot(
    sourceFiber: Fiber,
    lane: Lane,
  ): FiberRoot | null {
    sourceFiber.lanes = mergeLanes(sourceFiber.lanes, lane);
    let alternate = sourceFiber.alternate;
    if (alternate !== null) {
      alternate.lanes = mergeLanes(alternate.lanes, lane);
    }
    let node = sourceFiber;
    let parent = sourceFiber.return;
    while (parent !== null) {//从触发更新的节点开始向上遍历到rootFiber
      parent.childLanes = mergeLanes(parent.childLanes, lane);//合并childLanes优先级
      alternate = parent.alternate;
      if (alternate !== null) {
        alternate.childLanes = mergeLanes(alternate.childLanes, lane);
      } else {
      }
      node = parent;
      parent = parent.return;
    }
    if (node.tag === HostRoot) {
      const root: FiberRoot = node.stateNode;
      return root;
    } else {
      return null;
    }
  }
例如B节点触发更新,B节点被被标记为normal的update,也就是图中的u1,然后向上遍历到根节点,在根节点上打上一个normal的update,如果此时B节点又触发了一个userBlocking的Update,同样会向上遍历到根节点,在根节点上打上一个userBlocking的update。
如果当前根节点更新的优先级是normal,u1、u2都参与状态的计算,如果当前根节点更新的优先级是userBlocking,则只有u2参与计算

调度
在ensureRootIsScheduled中,scheduleCallback会以一个优先级调度render阶段的开始函数performSyncWorkOnRoot或者performConcurrentWorkOnRoot
//ReactFiberWorkLoop.old.js
if (newCallbackPriority === SyncLanePriority) {
  // 任务已经过期,需要同步执行render阶段
  newCallbackNode = scheduleSyncCallback(
    performSyncWorkOnRoot.bind(null, root)
  );
} else {
  // 根据任务优先级异步执行render阶段
  var schedulerPriorityLevel = lanePriorityToSchedulerPriority(
    newCallbackPriority
  );
  newCallbackNode = scheduleCallback(
    schedulerPriorityLevel,
    performConcurrentWorkOnRoot.bind(null, root)
  );
}
状态更新
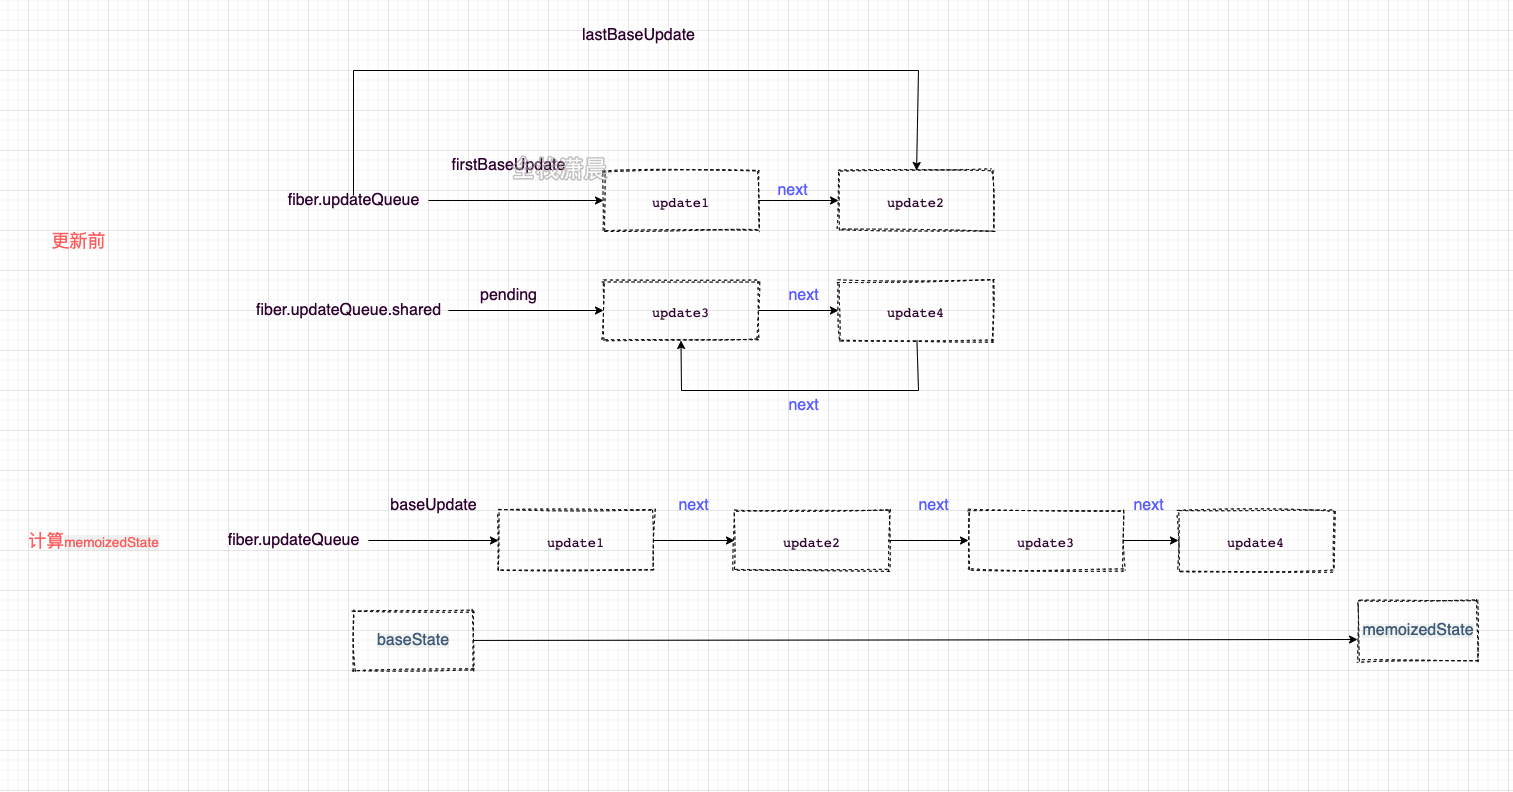
classComponent状态计算发生在processUpdateQueue函数中,涉及很多链表操作,看图更加直白
初始时fiber.updateQueue单链表上有firstBaseUpdate(update1)和lastBaseUpdate(update2),以next连接
fiber.updateQueue.shared环状链表上有update3和update4,以next连接互相连接
计算state时,先将fiber.updateQueue.shared环状链表‘剪开’,形成单链表,连接在fiber.updateQueue后面形成baseUpdate
然后遍历按这条链表,根据baseState计算出memoizedState
带优先级的状态更新
类似git提交,这里的c3意味着高优先级的任务,比如用户出发的事件,数据请求,同步执行的代码等。
通过ReactDOM.render创建的应用没有优先级的概念,类比git提交,相当于先commit,然后提交c3
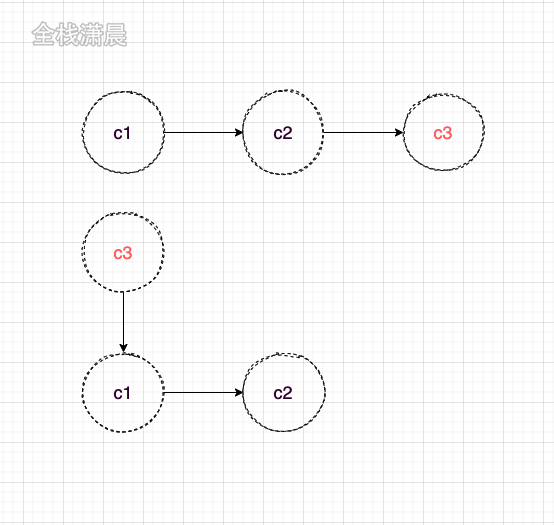
在concurrent模式下,类似git rebase,先暂存之前的代码,在master上开发,然后rebase到之前的分支上
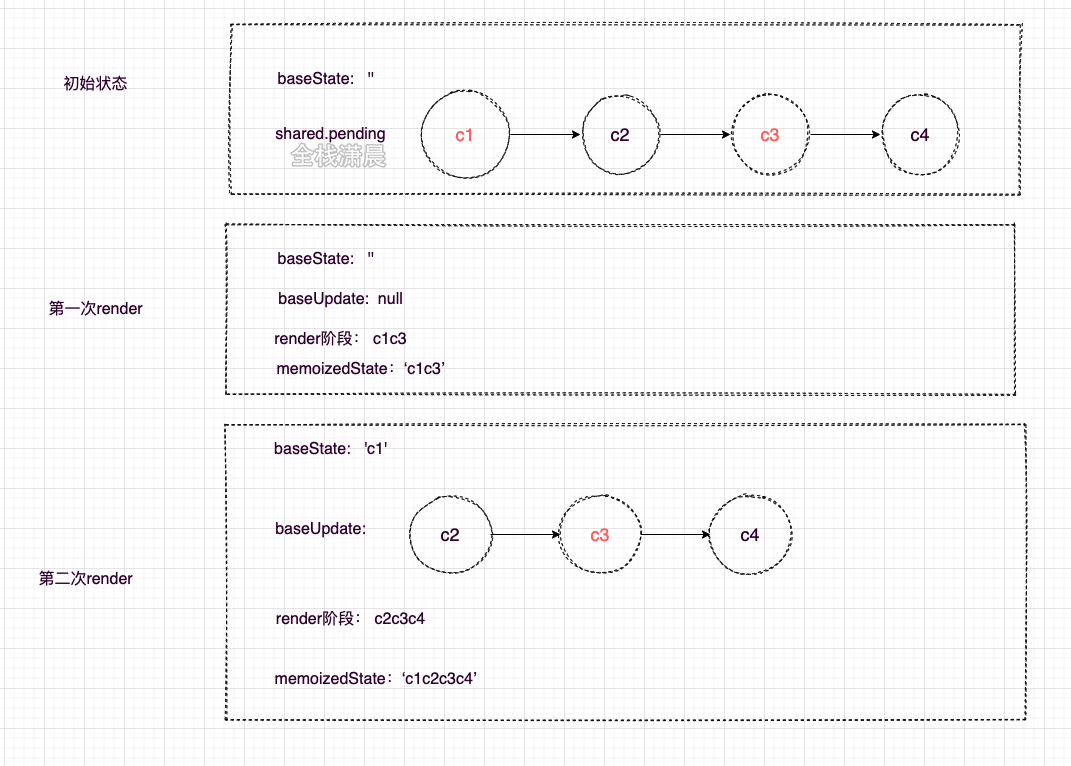
优先级是由Scheduler来调度的,这里我们只关心状态计算时的优先级排序,也就是在函数processUpdateQueue中发生的计算,例如初始时有c1-c4四个update,其中c1和c3为高优先级
在第一次render的时候,低优先级的update会跳过,所以只有c1和c3加入状态的计算
在第二次render的时候,会以第一次中跳过的update(c2)之前的update(c1)作为baseState,跳过的update和之后的update(c2,c3,c4)作为baseUpdate重新计算
在在concurrent模式下,componentWillMount可能会执行多次,变现和之前的版本不一致
注意,fiber.updateQueue.shared会同时存在于workInprogress Fiber和current Fiber,目的是为了防止高优先级打断正在进行的计算而导致状态丢失,这段代码也是发生在processUpdateQueue中
看demo_8的优先级
现在来看下计算状态的函数
//ReactUpdateQueue.old.js
export function processUpdateQueue<State>(
  workInProgress: Fiber,
  props: any,
  instance: any,
  renderLanes: Lanes,
): void {
  const queue: UpdateQueue<State> = (workInProgress.updateQueue: any);
  hasForceUpdate = false;

  let firstBaseUpdate = queue.firstBaseUpdate;//updateQueue的第一个Update
  let lastBaseUpdate = queue.lastBaseUpdate;//updateQueue的最后一个Update
  let pendingQueue = queue.shared.pending;//未计算的pendingQueue

  if (pendingQueue !== null) {
    queue.shared.pending = null;
    const lastPendingUpdate = pendingQueue;//未计算的ppendingQueue的最后一个update
    const firstPendingUpdate = lastPendingUpdate.next;//未计算的pendingQueue的第一个update
    lastPendingUpdate.next = null;//剪开环状链表
    if (lastBaseUpdate === null) {//将pendingQueue加入到updateQueue
      firstBaseUpdate = firstPendingUpdate;
    } else {
      lastBaseUpdate.next = firstPendingUpdate;
    }
    lastBaseUpdate = lastPendingUpdate;

    const current = workInProgress.alternate;//current上做同样的操作
    if (current !== null) {
      const currentQueue: UpdateQueue<State> = (current.updateQueue: any);
      const currentLastBaseUpdate = currentQueue.lastBaseUpdate;
      if (currentLastBaseUpdate !== lastBaseUpdate) {
        if (currentLastBaseUpdate === null) {
          currentQueue.firstBaseUpdate = firstPendingUpdate;
        } else {
          currentLastBaseUpdate.next = firstPendingUpdate;
        }
        currentQueue.lastBaseUpdate = lastPendingUpdate;
      }
    }
  }

  if (firstBaseUpdate !== null) {
    let newState = queue.baseState;

    let newLanes = NoLanes;

    let newBaseState = null;
    let newFirstBaseUpdate = null;
    let newLastBaseUpdate = null;

    let update = firstBaseUpdate;
    do {
      const updateLane = update.lane;
      const updateEventTime = update.eventTime;
      if (!isSubsetOfLanes(renderLanes, updateLane)) {//判断优先级是够足够
        const clone: Update<State> = {//优先级不够 跳过当前update
          eventTime: updateEventTime,
          lane: updateLane,

          tag: update.tag,
          payload: update.payload,
          callback: update.callback,

          next: null,
        };
        if (newLastBaseUpdate === null) {//保存跳过的update
          newFirstBaseUpdate = newLastBaseUpdate = clone;
          newBaseState = newState;
        } else {
          newLastBaseUpdate = newLastBaseUpdate.next = clone;
        }
        newLanes = mergeLanes(newLanes, updateLane);
      } else {
        //直到newLastBaseUpdate为null才不会计算,防止updateQueue没计算完
        if (newLastBaseUpdate !== null) {
          const clone: Update<State> = {
            eventTime: updateEventTime,
            lane: NoLane,

            tag: update.tag,
            payload: update.payload,
            callback: update.callback,

            next: null,
          };
          newLastBaseUpdate = newLastBaseUpdate.next = clone;
        }

        newState = getStateFromUpdate(//根据updateQueue计算state
          workInProgress,
          queue,
          update,
          newState,
          props,
          instance,
        );
        const callback = update.callback;
        if (callback !== null) {
          workInProgress.flags |= Callback;//Callback flag
          const effects = queue.effects;
          if (effects === null) {
            queue.effects = [update];
          } else {
            effects.push(update);
          }
        }
      }
      update = update.next;//下一个update
      if (update === null) {//重置updateQueue
        pendingQueue = queue.shared.pending;
        if (pendingQueue === null) {
          break;
        } else {
          const lastPendingUpdate = pendingQueue;

          const firstPendingUpdate = ((lastPendingUpdate.next: any): Update<State>);
          lastPendingUpdate.next = null;
          update = firstPendingUpdate;
          queue.lastBaseUpdate = lastPendingUpdate;
          queue.shared.pending = null;
        }
      }
    } while (true);

    if (newLastBaseUpdate === null) {
      newBaseState = newState;
    }

    queue.baseState = ((newBaseState: any): State);//新的state
    queue.firstBaseUpdate = newFirstBaseUpdate;//新的第一个update
    queue.lastBaseUpdate = newLastBaseUpdate;//新的最后一个update

    markSkippedUpdateLanes(newLanes);
    workInProgress.lanes = newLanes;
    workInProgress.memoizedState = newState;
  }

    //...
}
hooks源码
hook调用入口
在hook源码中hook存在于Dispatcher中,Dispatcher就是一个对象,不同hook 调用的函数不一样,全局变量ReactCurrentDispatcher.current会根据是mount还是update赋值为HooksDispatcherOnMount或HooksDispatcherOnUpdate
ReactCurrentDispatcher.current =
  current === null || current.memoizedState === null//mount or update
  ? HooksDispatcherOnMount
    : HooksDispatcherOnUpdate;
const HooksDispatcherOnMount: Dispatcher = {//mount时
  useCallback: mountCallback,
  useContext: readContext,
  useEffect: mountEffect,
  useImperativeHandle: mountImperativeHandle,
  useLayoutEffect: mountLayoutEffect,
  useMemo: mountMemo,
  useReducer: mountReducer,
  useRef: mountRef,
  useState: mountState,
  //...
};

const HooksDispatcherOnUpdate: Dispatcher = {//update时
  useCallback: updateCallback,
  useContext: readContext,
  useEffect: updateEffect,
  useImperativeHandle: updateImperativeHandle,
  useLayoutEffect: updateLayoutEffect,
  useMemo: updateMemo,
  useReducer: updateReducer,
  useRef: updateRef,
  useState: updateState,
  //...
};
hook数据结构
在FunctionComponent中,多个hook会形成hook链表,保存在Fiber的memoizedState的上,而需要更新的Update保存在hook.queue.pending中
const hook: Hook = {
  memoizedState: null,//对于不同hook,有不同的值
  baseState: null,//初始state
  baseQueue: null,//初始queue队列
  queue: null,//需要更新的update
  next: null,//下一个hook
};
下面来看下memoizedState对应的值
- useState:例如
const [state, updateState] = useState(initialState),memoizedState等于state的值 - useReducer:例如
const [state, dispatch] = useReducer(reducer, {});,memoizedState等于state的值 - useEffect:在mountEffect时会调用pushEffect创建effect链表,
memoizedState就等于effect链表,effect链表也会挂载到fiber.updateQueue上,每个effect上存在useEffect的第一个参数回调和第二个参数依赖数组,例如,useEffect(callback, [dep]),effect就是{create:callback, dep:dep,...} - useRef:例如
useRef(0),memoizedState就等于{current: 0} - useMemo:例如
useMemo(callback, [dep]),memoizedState等于[callback(), dep] - useCallback:例如
useCallback(callback, [dep]),memoizedState等于[callback, dep]。useCallback保存callback函数,useMemo保存callback的执行结果
useState&useReducer
之所以把useState和useReducer放在一起,是因为在源码中useState就是有默认reducer参数的useReducer。
useState&useReducer声明
resolveDispatcher函数会获取当前的Dispatcher
function useState(initialState) {
  var dispatcher = resolveDispatcher();
  return dispatcher.useState(initialState);
}
function useReducer(reducer, initialArg, init) {
  var dispatcher = resolveDispatcher();
  return dispatcher.useReducer(reducer, initialArg, init);
}
mount阶段
mount阶段useState调用mountState,useReducer调用mountReducer,唯一区别就是它们创建的queue中lastRenderedReducer不一样,mount有初始值basicStateReducer,所以说useState就是有默认reducer参数的useReducer。
function mountState<S>(//
  initialState: (() => S) | S,
): [S, Dispatch<BasicStateAction<S>>] {
  const hook = mountWorkInProgressHook();//创建当前hook
  if (typeof initialState === 'function') {
    initialState = initialState();
  }
  hook.memoizedState = hook.baseState = initialState;//hook.memoizedState赋值
  const queue = (hook.queue = {//赋值hook.queue
    pending: null,
    dispatch: null,
    lastRenderedReducer: basicStateReducer,//和mountReducer的区别
    lastRenderedState: (initialState: any),
  });
  const dispatch: Dispatch<//创建dispatch函数
    BasicStateAction<S>,
  > = (queue.dispatch = (dispatchAction.bind(
    null,
    currentlyRenderingFiber,
    queue,
  ): any));
  return [hook.memoizedState, dispatch];//返回memoizedState和dispatch
}

function mountReducer<S, I, A>(
  reducer: (S, A) => S,
  initialArg: I,
  init?: I => S,
): [S, Dispatch<A>] {
  const hook = mountWorkInProgressHook();//创建当前hook
  let initialState;
  if (init !== undefined) {
    initialState = init(initialArg);
  } else {
    initialState = ((initialArg: any): S);
  }
  hook.memoizedState = hook.baseState = initialState;//hook.memoizedState赋值
  const queue = (hook.queue = {//创建queue
    pending: null,
    dispatch: null,
    lastRenderedReducer: reducer,
    lastRenderedState: (initialState: any),
  });
  const dispatch: Dispatch<A> = (queue.dispatch = (dispatchAction.bind(//创建dispatch函数
    null,
    currentlyRenderingFiber,
    queue,
  ): any));
  return [hook.memoizedState, dispatch];//返回memoizedState和dispatch
}
function basicStateReducer<S>(state: S, action: BasicStateAction<S>): S {
  return typeof action === 'function' ? action(state) : action;
}
update阶段
update时会根据hook中的update计算新的state
function updateReducer<S, I, A>(
  reducer: (S, A) => S,
  initialArg: I,
  init?: I => S,
): [S, Dispatch<A>] {
  const hook = updateWorkInProgressHook();//获取hook
  const queue = hook.queue;
  queue.lastRenderedReducer = reducer;

  //...更新state和第12章的state计算逻辑基本一致

  const dispatch: Dispatch<A> = (queue.dispatch: any);
  return [hook.memoizedState, dispatch];
}
执行阶段
useState执行setState后会调用dispatchAction,dispatchAction做的事情就是讲Update加入queue.pending中,然后开始调度
function dispatchAction(fiber, queue, action) {

  var update = {//创建update
    eventTime: eventTime,
    lane: lane,
    suspenseConfig: suspenseConfig,
    action: action,
    eagerReducer: null,
    eagerState: null,
    next: null
  };

  //queue.pending中加入update

  var alternate = fiber.alternate;

  if (fiber === currentlyRenderingFiber$1 || alternate !== null && alternate === currentlyRenderingFiber$1) {
    //如果是render阶段执行的更新didScheduleRenderPhaseUpdate=true
}
    didScheduleRenderPhaseUpdateDuringThisPass = didScheduleRenderPhaseUpdate = true;
  } else {
    if (fiber.lanes === NoLanes && (alternate === null || alternate.lanes === NoLanes)) {
      //如果fiber不存在优先级并且当前alternate不存在或者没有优先级,那就不需要更新了
      //优化的步骤
    }

    scheduleUpdateOnFiber(fiber, lane, eventTime);
  }
}
useEffect
声明
获取并返回useEffect函数
export function useEffect(
  create: () => (() => void) | void,
  deps: Array<mixed> | void | null,
): void {
  const dispatcher = resolveDispatcher();
  return dispatcher.useEffect(create, deps);
}
mount阶段
调用mountEffect,mountEffect调用mountEffectImpl,hook.memoizedState赋值为effect链表
function mountEffectImpl(fiberFlags, hookFlags, create, deps): void {
  const hook = mountWorkInProgressHook();//获取hook
  const nextDeps = deps === undefined ? null : deps;//依赖
  currentlyRenderingFiber.flags |= fiberFlags;//增加flag
  hook.memoizedState = pushEffect(//memoizedState=effects环状链表
    HookHasEffect | hookFlags,
    create,
    undefined,
    nextDeps,
  );
}
update阶段
浅比较依赖,如果依赖性变了pushEffect第一个参数传HookHasEffect | hookFlags,HookHasEffect表示useEffect依赖项改变了,需要在commit阶段重新执行
function updateEffectImpl(fiberFlags, hookFlags, create, deps): void {
  const hook = updateWorkInProgressHook();
  const nextDeps = deps === undefined ? null : deps;
  let destroy = undefined;

  if (currentHook !== null) {
    const prevEffect = currentHook.memoizedState;
    destroy = prevEffect.destroy;//
    if (nextDeps !== null) {
      const prevDeps = prevEffect.deps;
      if (areHookInputsEqual(nextDeps, prevDeps)) {//比较deps
        //即使依赖相等也要将effect加入链表,以保证顺序一致
        pushEffect(hookFlags, create, destroy, nextDeps);
        return;
      }
    }
  }

  currentlyRenderingFiber.flags |= fiberFlags;

  hook.memoizedState = pushEffect(
    //参数传HookHasEffect | hookFlags,包含hookFlags的useEffect会在commit阶段执行这个effect
    HookHasEffect | hookFlags,
    create,
    destroy,
    nextDeps,
  );
}
执行阶段
在第9章commit阶段的commitLayoutEffects函数中会调用schedulePassiveEffects,将useEffect的销毁和回调函数push到pendingPassiveHookEffectsUnmount和pendingPassiveHookEffectsMount中,然后在mutation之后调用flushPassiveEffects依次执行上次render的销毁函数回调和本次render 的回调函数
const unmountEffects = pendingPassiveHookEffectsUnmount;
pendingPassiveHookEffectsUnmount = [];
for (let i = 0; i < unmountEffects.length; i += 2) {
  const effect = ((unmountEffects[i]: any): HookEffect);
  const fiber = ((unmountEffects[i + 1]: any): Fiber);
  const destroy = effect.destroy;
  effect.destroy = undefined;

  if (typeof destroy === 'function') {
    try {
      destroy();//销毁函数执行
    } catch (error) {
      captureCommitPhaseError(fiber, error);
    }
  }
}

const mountEffects = pendingPassiveHookEffectsMount;
pendingPassiveHookEffectsMount = [];
for (let i = 0; i < mountEffects.length; i += 2) {
  const effect = ((mountEffects[i]: any): HookEffect);
  const fiber = ((mountEffects[i + 1]: any): Fiber);

  try {
    const create = effect.create;//本次render的创建函数
   effect.destroy = create();
  } catch (error) {
    captureCommitPhaseError(fiber, error);
  }
}
useRef
sring类型的ref已经不在推荐使用(源码中string会生成refs,发生在coerceRef函数中),ForwardRef只是把ref通过传参传下去,createRef也是{current: any这种结构,所以我们只讨论function或者{current: any}的useRef
//createRef返回{current: any}
export function createRef(): RefObject {
  const refObject = {
    current: null,
  };
  return refObject;
}
声明阶段
和其他hook一样
export function useRef<T>(initialValue: T): {|current: T|} {
  const dispatcher = resolveDispatcher();
  return dispatcher.useRef(initialValue);
}
mount阶段
mount时会调用mountRef,创建hook和ref对象。
function mountRef<T>(initialValue: T): {|current: T|} {
  const hook = mountWorkInProgressHook();//获取useRef
  const ref = {current: initialValue};//ref初始化
  hook.memoizedState = ref;
  return ref;
}
render阶段:将带有ref属性的Fiber标记上Ref Tag,这一步发生在beginWork和completeWork函数中的markRef
export const Ref = /* */ 0b0000000010000000;//beginWork中
function markRef(current: Fiber | null, workInProgress: Fiber) {
const ref = workInProgress.ref;
if (
(current === null && ref !== null) ||
(current !== null && current.ref !== ref)
) {
workInProgress.effectTag |= Ref;
}
}
//completeWork中
function markRef(workInProgress: Fiber) {
workInProgress.effectTag |= Ref;
}commit阶段:
会在commitMutationEffects函数中判断ref是否改变,如果改变了会先执行commitDetachRef先删除之前的ref,然后在commitLayoutEffect中会执行commitAttachRef赋值ref。
function commitMutationEffects(root: FiberRoot, renderPriorityLevel) {
  while (nextEffect !== null) {
    const effectTag = nextEffect.effectTag;
    // ...

    if (effectTag & Ref) {
      const current = nextEffect.alternate;
      if (current !== null) {
        commitDetachRef(current);//移除ref
      }
    }
  }
function commitDetachRef(current: Fiber) {
const currentRef = current.ref;
if (currentRef !== null) {
if (typeof currentRef === 'function') {
currentRef(null);//类型是function,则调用
} else {
currentRef.current = null;//否则赋值{current: null}
}
}
}
function commitAttachRef(finishedWork: Fiber) {
  const ref = finishedWork.ref;
  if (ref !== null) {
    const instance = finishedWork.stateNode;//获取ref的实例
    let instanceToUse;
    switch (finishedWork.tag) {
      case HostComponent:
        instanceToUse = getPublicInstance(instance);
        break;
      default:
        instanceToUse = instance;
    }

    if (typeof ref === 'function') {//ref赋值
      ref(instanceToUse);
    } else {
      ref.current = instanceToUse;
    }
  }
}
update阶段
update时调用updateRef获取获取当前useRef,然后返回hook链表
function updateRef<T>(initialValue: T): {|current: T|} {
  const hook = updateWorkInProgressHook();//获取当前useRef
  return hook.memoizedState;//返回hook链表
}
useMemo&useCallback
声明阶段
和其他hook 一样
mount阶段
mount阶段useMemo和useCallback唯一区别是在memoizedState中存贮callback还是callback计算出来的函数
function mountMemo<T>(
  nextCreate: () => T,
  deps: Array<mixed> | void | null,
): T {
  const hook = mountWorkInProgressHook();//创建hook
  const nextDeps = deps === undefined ? null : deps;
  const nextValue = nextCreate();//计算value
  hook.memoizedState = [nextValue, nextDeps];//把value和依赖保存在memoizedState中
  return nextValue;
}

function mountCallback<T>(callback: T, deps: Array<mixed> | void | null): T {
  const hook = mountWorkInProgressHook();//创建hook
  const nextDeps = deps === undefined ? null : deps;
  hook.memoizedState = [callback, nextDeps];//把callback和依赖保存在memoizedState中
  return callback;
}
update阶段
update时也一样,唯一区别就是直接用回调函数还是执行回调后返回的value作为[?, nextDeps]赋值给memoizedState
function updateMemo<T>(
  nextCreate: () => T,
  deps: Array<mixed> | void | null,
): T {
  const hook = updateWorkInProgressHook();//获取hook
  const nextDeps = deps === undefined ? null : deps;
  const prevState = hook.memoizedState;

  if (prevState !== null) {
    if (nextDeps !== null) {
      const prevDeps: Array<mixed> | null = prevState[1];
      if (areHookInputsEqual(nextDeps, prevDeps)) {//浅比较依赖
        return prevState[0];//没变 返回之前的状态
      }
    }
  }
  const nextValue = nextCreate();//有变化重新调用callback
  hook.memoizedState = [nextValue, nextDeps];
  return nextValue;
}

function updateCallback<T>(callback: T, deps: Array<mixed> | void | null): T {
  const hook = updateWorkInProgressHook();//获取hook
  const nextDeps = deps === undefined ? null : deps;
  const prevState = hook.memoizedState;

  if (prevState !== null) {
    if (nextDeps !== null) {
      const prevDeps: Array<mixed> | null = prevState[1];
      if (areHookInputsEqual(nextDeps, prevDeps)) {//浅比较依赖
        return prevState[0];//没变 返回之前的状态
      }
    }
  }

  hook.memoizedState = [callback, nextDeps];//变了重新将[callback, nextDeps]赋值给memoizedState
  return callback;
}
useLayoutEffect
useLayoutEffect和useEffect一样,只是调用的时机不同,它是在commit阶段的commitLayout函数中同步执行
forwardRef
forwardRef也非常简单,就是传递ref属性
export function forwardRef<Props, ElementType: React$ElementType>(
  render: (props: Props, ref: React$Ref<ElementType>) => React$Node,
) {

  const elementType = {
    $$typeof: REACT_FORWARD_REF_TYPE,
    render,
  };

  return elementType;
}
//ForwardRef第二个参数是ref对象
let children = Component(props, secondArg);
手写hooks
最关键的是要理解hook队列和update队列的指针指向和updateQueue的更新计算,详细见视频讲解
import React from "react";
import ReactDOM from "react-dom";

let workInProgressHook;//当前工作中的hook
let isMount = true;//是否时mount时

const fiber = {//fiber节点
  memoizedState: null,//hook链表
  stateNode: App//dom
};

const Dispatcher = (() => {//Dispatcher对象
  function mountWorkInProgressHook() {//mount时调用
    const hook = {//构建hook
      queue: {//更新队列
        pending: null//未执行的update队列
      },
      memoizedState: null,//当前state
      next: null//下一个hook
    };
    if (!fiber.memoizedState) {
      fiber.memoizedState = hook;//第一个hook的话直接赋值给fiber.memoizedState
    } else {
      workInProgressHook.next = hook;//不是第一个的话就加在上一个hook的后面,形成链表
    }
    workInProgressHook = hook;//记录当前工作的hook
    return workInProgressHook;
  }
  function updateWorkInProgressHook() {//update时调用
    let curHook = workInProgressHook;
    workInProgressHook = workInProgressHook.next;//下一个hook
    return curHook;
  }
  function useState(initialState) {
    let hook;
    if (isMount) {
      hook = mountWorkInProgressHook();
      hook.memoizedState = initialState;//初始状态
    } else {
      hook = updateWorkInProgressHook();
    }

    let baseState = hook.memoizedState;//初始状态
    if (hook.queue.pending) {
      let firstUpdate = hook.queue.pending.next;//第一个update

      do {
        const action = firstUpdate.action;
        baseState = action(baseState);
        firstUpdate = firstUpdate.next;//循环update链表
      } while (firstUpdate !== hook.queue.pending);//通过update的action计算state

      hook.queue.pending = null;//重置update链表
    }
    hook.memoizedState = baseState;//赋值新的state

    return [baseState, dispatchAction.bind(null, hook.queue)];//useState的返回
  }

  return {
    useState
  };
})();

function dispatchAction(queue, action) {//触发更新
  const update = {//构建update
    action,
    next: null
  };
  if (queue.pending === null) {
    update.next = update;//update的环状链表
  } else {
    update.next = queue.pending.next;//新的update的next指向前一个update
    queue.pending.next = update;//前一个update的next指向新的update
  }
  queue.pending = update;//更新queue.pending

  isMount = false;//标志mount结束
  workInProgressHook = fiber.memoizedState;//更新workInProgressHook
  schedule();//调度更新
}

function App() {
  let [count, setCount] = Dispatcher.useState(1);
  let [age, setAge] = Dispatcher.useState(10);
  return (
    <>
      <p>Clicked {count} times</p>
      <button onClick={() => setCount(() => count + 1)}> Add count</button>
      <p>Age is {age}</p>
      <button onClick={() => setAge(() => age + 1)}> Add age</button>
    </>
  );
}

function schedule() {
  ReactDOM.render(<App />, document.querySelector("#root"));
}

schedule();
scheduler&Lane
当我们在类似下面的搜索框组件进行搜索时会发现,组件分为搜索部分和搜索结果展示列表,我们期望输入框能立刻响应,结果列表可以有等待的时间,如果结果列表数据量很大,在进行渲染的时候,我们又输入了一些文字,因为用户输入事件的优先级是很高的,所以就要停止结果列表的渲染,这就引出了不同任务之间的优先级和调度

Scheduler
我们知道如果我们的应用占用较长的js执行时间,比如超过了设备一帧的时间,那么设备的绘制就会出不的现象。
Scheduler主要的功能是时间切片和调度优先级,react在对比差异的时候会占用一定的js执行时间,Scheduler内部借助MessageChannel实现了在浏览器绘制之前指定一个时间片,如果react在指定时间内没对比完,Scheduler就会强制交出执行权给浏览器

时间切片
在浏览器的一帧中js的执行时间如下

requestIdleCallback是在浏览器重绘重排之后,如果还有空闲就可以执行的时机,所以为了不影响重绘重排,可以在浏览器在requestIdleCallback中执行耗性能的计算,但是由于requestIdleCallback存在兼容和触发时机不稳定的问题,scheduler中采用MessageChannel来实现requestIdleCallback,当前环境不支持MessageChannel就采用setTimeout。
在之前的介绍中我们知道在performUnitOfWork之后会执行render阶段和commit阶段,如果在浏览器的一帧中,cup的计算还没完成,就会让出js执行权给浏览器,这个判断在workLoopConcurrent函数中,shouldYield就是用来判断剩余的时间有没有用尽。在源码中每个时间片时5ms,这个值会根据设备的fps调整。
function workLoopConcurrent() {
  while (workInProgress !== null && !shouldYield()) {
    performUnitOfWork(workInProgress);
  }
}
function forceFrameRate(fps) {//计算时间片
  if (fps < 0 || fps > 125) {
    console['error'](
      'forceFrameRate takes a positive int between 0 and 125, ' +
        'forcing frame rates higher than 125 fps is not supported',
    );
    return;
  }
  if (fps > 0) {
    yieldInterval = Math.floor(1000 / fps);
  } else {
    yieldInterval = 5;//时间片默认5ms
  }
}
任务的暂停
在shouldYield函数中有一段,所以可以知道,如果当前时间大于任务开始的时间+yieldInterval,就打断了任务的进行。
//deadline = currentTime + yieldInterval,deadline是在performWorkUntilDeadline函数中计算出来的
if (currentTime >= deadline) {
  //...
    return true
}
调度优先级
在Scheduler中有两个函数可以创建具有优先级的任务
runWithPriority:以一个优先级执行callback,如果是同步的任务,优先级就是ImmediateSchedulerPriority
function unstable_runWithPriority(priorityLevel, eventHandler) {
  switch (priorityLevel) {//5种优先级
    case ImmediatePriority:
    case UserBlockingPriority:
    case NormalPriority:
    case LowPriority:
    case IdlePriority:
      break;
    default:
      priorityLevel = NormalPriority;
  }

  var previousPriorityLevel = currentPriorityLevel;//保存当前的优先级
  currentPriorityLevel = priorityLevel;//priorityLevel赋值给currentPriorityLevel

  try {
    return eventHandler();//回调函数
  } finally {
    currentPriorityLevel = previousPriorityLevel;//还原之前的优先级
  }
}
scheduleCallback:以一个优先级注册callback,在适当的时机执行,因为涉及过期时间的计算,所以scheduleCallback比runWithPriority的粒度更细。
在scheduleCallback中优先级意味着过期时间,优先级越高priorityLevel就越小,过期时间离当前时间就越近,
var expirationTime = startTime + timeout;例如IMMEDIATE_PRIORITY_TIMEOUT=-1,那var expirationTime = startTime + (-1);就小于当前时间了,所以要立即执行。scheduleCallback调度的过程用到了小顶堆,所以我们可以在O(1)的复杂度找到优先级最高的task,不了解可以查阅资料,在源码中小顶堆存放着任务,每次peek都能取到离过期时间最近的task。
scheduleCallback中,未过期任务task存放在timerQueue中,过期任务存放在taskQueue中。
新建newTask任务之后,判断newTask是否过期,没过期就加入timerQueue中,如果此时taskQueue中还没有过期任务,timerQueue中离过期时间最近的task正好是newTask,则设置个定时器,到了过期时间就加入taskQueue中。
当timerQueue中有任务,就取出最早过期的任务执行。
function unstable_scheduleCallback(priorityLevel, callback, options) {
  var currentTime = getCurrentTime();

  var startTime;//开始时间
  if (typeof options === 'object' && options !== null) {
    var delay = options.delay;
    if (typeof delay === 'number' && delay > 0) {
      startTime = currentTime + delay;
    } else {
      startTime = currentTime;
    }
  } else {
    startTime = currentTime;
  }

  var timeout;
  switch (priorityLevel) {
    case ImmediatePriority://优先级越高timeout越小
      timeout = IMMEDIATE_PRIORITY_TIMEOUT;//-1
      break;
    case UserBlockingPriority:
      timeout = USER_BLOCKING_PRIORITY_TIMEOUT;//250
      break;
    case IdlePriority:
      timeout = IDLE_PRIORITY_TIMEOUT;
      break;
    case LowPriority:
      timeout = LOW_PRIORITY_TIMEOUT;
      break;
    case NormalPriority:
    default:
      timeout = NORMAL_PRIORITY_TIMEOUT;
      break;
  }

  var expirationTime = startTime + timeout;//优先级越高 过期时间越小

  var newTask = {//新建task
    id: taskIdCounter++,
    callback//回调函数
    priorityLevel,
    startTime,//开始时间
    expirationTime,//过期时间
    sortIndex: -1,
  };
  if (enableProfiling) {
    newTask.isQueued = false;
  }

  if (startTime > currentTime) {//没有过期
    newTask.sortIndex = startTime;
    push(timerQueue, newTask);//加入timerQueue
    //taskQueue中还没有过期任务,timerQueue中离过期时间最近的task正好是newTask
    if (peek(taskQueue) === null && newTask === peek(timerQueue)) {
      if (isHostTimeoutScheduled) {
        cancelHostTimeout();
      } else {
        isHostTimeoutScheduled = true;
      }
      //定时器,到了过期时间就加入taskQueue中
      requestHostTimeout(handleTimeout, startTime - currentTime);
    }
  } else {
    newTask.sortIndex = expirationTime;
    push(taskQueue, newTask);//加入taskQueue
    if (enableProfiling) {
      markTaskStart(newTask, currentTime);
      newTask.isQueued = true;
    }
    if (!isHostCallbackScheduled && !isPerformingWork) {
      isHostCallbackScheduled = true;
      requestHostCallback(flushWork);//执行过期的任务
    }
  }

  return newTask;
}

任务暂停之后怎么继续
在workLoop函数中有这样一段
const continuationCallback = callback(didUserCallbackTimeout);//callback就是调度的callback
currentTime = getCurrentTime();
if (typeof continuationCallback === 'function') {//判断callback执行之后的返回值类型
  currentTask.callback = continuationCallback;//如果是function类型就把又赋值给currentTask.callback
  markTaskYield(currentTask, currentTime);
} else {
  if (enableProfiling) {
    markTaskCompleted(currentTask, currentTime);
    currentTask.isQueued = false;
  }
  if (currentTask === peek(taskQueue)) {
    pop(taskQueue);//如果是function类型就从taskQueue中删除
  }
}
advanceTimers(currentTime);
在performConcurrentWorkOnRoot函数的结尾有这样一个判断,如果callbackNode等于originalCallbackNode那就恢复任务的执行
if (root.callbackNode === originalCallbackNode) {
  // The task node scheduled for this root is the same one that's
  // currently executed. Need to return a continuation.
  return performConcurrentWorkOnRoot.bind(null, root);
}
Lane
Lane的和Scheduler是两套优先级机制,相比来说Lane的优先级粒度更细,Lane的意思是车道,类似赛车一样,在task获取优先级时,总是会优先抢内圈的赛道,Lane表示的优先级有以下几个特点。
可以表示不同批次的优先级
从代码中中可以看到,每个优先级都是个31位二进制数字,1表示该位置可以用,0代表这个位置不能用,从第一个优先级NoLanes到OffscreenLane优先级是降低的,优先级越低1的个数也就越多(赛车比赛外圈的车越多),也就是说含多个1的优先级就是同一个批次。
export const NoLanes: Lanes = /*                        */ 0b0000000000000000000000000000000;
export const NoLane: Lane = /*                          */ 0b0000000000000000000000000000000;

export const SyncLane: Lane = /*                        */ 0b0000000000000000000000000000001;
export const SyncBatchedLane: Lane = /*                 */ 0b0000000000000000000000000000010;

export const InputDiscreteHydrationLane: Lane = /*      */ 0b0000000000000000000000000000100;
const InputDiscreteLanes: Lanes = /*                    */ 0b0000000000000000000000000011000;

const InputContinuousHydrationLane: Lane = /*           */ 0b0000000000000000000000000100000;
const InputContinuousLanes: Lanes = /*                  */ 0b0000000000000000000000011000000;

export const DefaultHydrationLane: Lane = /*            */ 0b0000000000000000000000100000000;
export const DefaultLanes: Lanes = /*                   */ 0b0000000000000000000111000000000;

const TransitionHydrationLane: Lane = /*                */ 0b0000000000000000001000000000000;
const TransitionLanes: Lanes = /*                       */ 0b0000000001111111110000000000000;

const RetryLanes: Lanes = /*                            */ 0b0000011110000000000000000000000;

export const SomeRetryLane: Lanes = /*                  */ 0b0000010000000000000000000000000;

export const SelectiveHydrationLane: Lane = /*          */ 0b0000100000000000000000000000000;

const NonIdleLanes = /*                                 */ 0b0000111111111111111111111111111;

export const IdleHydrationLane: Lane = /*               */ 0b0001000000000000000000000000000;
const IdleLanes: Lanes = /*                             */ 0b0110000000000000000000000000000;

export const OffscreenLane: Lane = /*                   */ 0b1000000000000000000000000000000;
优先级的计算的性能高
例如,可以通过二进制按位与来判断a和b代表的lane是否存在交集
export function includesSomeLane(a: Lanes | Lane, b: Lanes | Lane) {
  return (a & b) !== NoLanes;
}
Lane模型中task是怎么获取优先级的(赛车的初始赛道)
任务获取赛道的方式是从高优先级的lanes开始的,这个过程发生在findUpdateLane函数中,如果高优先级没有可用的lane了就下降到优先级低的lanes中寻找,其中pickArbitraryLane会调用getHighestPriorityLane获取一批lanes中优先级最高的那一位,也就是通过lanes & -lanes获取最右边的一位
export function findUpdateLane(
  lanePriority: LanePriority,
  wipLanes: Lanes,
): Lane {
  switch (lanePriority) {
    //...
    case DefaultLanePriority: {
      let lane = pickArbitraryLane(DefaultLanes & ~wipLanes);//找到下一个优先级最高的lane
      if (lane === NoLane) {//上一个level的lane都占满了下降到TransitionLanes继续寻找可用的赛道
        lane = pickArbitraryLane(TransitionLanes & ~wipLanes);
        if (lane === NoLane) {//TransitionLanes也满了
          lane = pickArbitraryLane(DefaultLanes);//从DefaultLanes开始找
        }
      }
      return lane;
    }
  }
}
Lane模型中高优先级是怎么插队的(赛车抢赛道)
在Lane模型中如果一个低优先级的任务执行,并且还在调度的时候触发了一个高优先级的任务,则高优先级的任务打断低优先级任务,此时应该先取消低优先级的任务,因为此时低优先级的任务可能已经进行了一段时间,Fiber树已经构建了一部分,所以需要将Fiber树还原,这个过程发生在函数prepareFreshStack中,在这个函数中会初始化已经构建的Fiber树
function ensureRootIsScheduled(root: FiberRoot, currentTime: number) {
  const existingCallbackNode = root.callbackNode;//之前已经调用过的setState的回调
  //...
    if (existingCallbackNode !== null) {
    const existingCallbackPriority = root.callbackPriority;
    //新的setState的回调和之前setState的回调优先级相等 则进入batchedUpdate的逻辑
    if (existingCallbackPriority === newCallbackPriority) {
      return;
    }
    //两个回调优先级不一致,则被高优先级任务打断,先取消当前低优先级的任务
    cancelCallback(existingCallbackNode);
  }
    //调度render阶段的起点
    newCallbackNode = scheduleCallback(
    schedulerPriorityLevel,
    performConcurrentWorkOnRoot.bind(null, root),
  );
    //...
}
function prepareFreshStack(root: FiberRoot, lanes: Lanes) {
  root.finishedWork = null;
  root.finishedLanes = NoLanes;
    //...
  //workInProgressRoot等变量重新赋值和初始化
  workInProgressRoot = root;
  workInProgress = createWorkInProgress(root.current, null);
  workInProgressRootRenderLanes = subtreeRenderLanes = workInProgressRootIncludedLanes = lanes;
  workInProgressRootExitStatus = RootIncomplete;
  workInProgressRootFatalError = null;
  workInProgressRootSkippedLanes = NoLanes;
  workInProgressRootUpdatedLanes = NoLanes;
  workInProgressRootPingedLanes = NoLanes;
    //...
}
Lane模型中怎么解决饥饿问题(最后一名赛车最后也要到达终点啊)
在调度优先级的过程中,会调用markStarvedLanesAsExpired遍历pendingLanes(未执行的任务包含的lane),如果没过期时间就计算一个过期时间,如果过期了就加入root.expiredLanes中,然后在下次调用getNextLane函数的时候会优先返回expiredLanes
export function markStarvedLanesAsExpired(
  root: FiberRoot,
  currentTime: number,
): void {

  const pendingLanes = root.pendingLanes;
  const suspendedLanes = root.suspendedLanes;
  const pingedLanes = root.pingedLanes;
  const expirationTimes = root.expirationTimes;

  let lanes = pendingLanes;
  while (lanes > 0) {//遍历lanes
    const index = pickArbitraryLaneIndex(lanes);
    const lane = 1 << index;

    const expirationTime = expirationTimes[index];
    if (expirationTime === NoTimestamp) {

      if (
        (lane & suspendedLanes) === NoLanes ||
        (lane & pingedLanes) !== NoLanes
      ) {
        expirationTimes[index] = computeExpirationTime(lane, currentTime);//计算过期时间
      }
    } else if (expirationTime <= currentTime) {//过期了
      root.expiredLanes |= lane;//在expiredLanes加入当前遍历到的lane
    }

    lanes &= ~lane;
  }
}
export function getNextLanes(root: FiberRoot, wipLanes: Lanes): Lanes {
    //...
  if (expiredLanes !== NoLanes) {
    nextLanes = expiredLanes;
    nextLanePriority = return_highestLanePriority = SyncLanePriority;//优先返回过期的lane
  } else {
  //...
    }
  return nextLanes;
}
下图更直观,随之时间的推移,低优先级的任务被插队,最后也会变成高优先级的任务
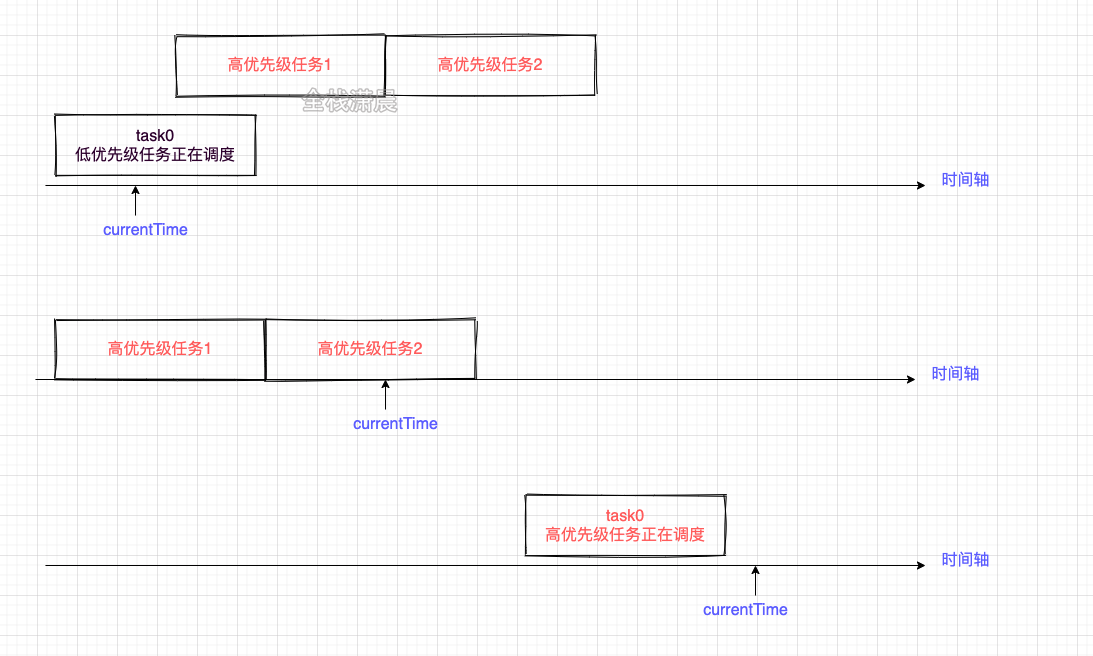
concurrent模式
concurrent mode
react17支持concurrent mode,这种模式的根本目的是为了让应用保持cpu和io的快速响应,它是一组新功能,包括Fiber、Scheduler、Lane,可以根据用户硬件性能和网络状况调整应用的响应速度,核心就是为了实现异步可中断的更新。concurrent mode也是未来react主要迭代的方向。
- cup:让耗时的reconcile的过程能让出js的执行权给更高优先级的任务,例如用户的输入,
- io:依靠Suspense
Fiber
Fiber我们之前介绍过,这里我们来看下在concurrent mode下Fiber的意义,react15之前的reconcile是同步执行的,当组件数量很多,reconcile时的计算量很大时,就会出现页面的卡顿,为了解决这个问题就需要一套异步可中断的更新来让耗时的计算让出js的执行权给高优先级的任务,在浏览器有空闲的时候再执行这些计算。所以我们需要一种数据结构来描述真实dom和更新的信息,在适当的时候可以在内存中中断reconcile的过程,这种数据结构就是Fiber。
Scheduler
Scheduler独立于react本身,相当于一个单独的package,Scheduler的意义在于,当cup的计算量很大时,我们根据设备的fps算出一帧的时间,在这个时间内执行cup的操作,当任务执行的时间快超过一帧的时间时,会暂停任务的执行,让浏览器有时间进行重排和重绘。在适当的时候继续任务。
在js中我们知道generator也可以暂停和继续任务,但是我们还需要用优先级来排列任务,这个是generator无法完成的。在Scheduler中使用MessageChannel实现了时间切片,然后用小顶堆排列任务优先级的高低,达到了异步可中断的更新。
Scheduler可以用过期时间来代表优先级的高低。
优先级越高,过期时间越短,离当前时间越近,也就是说过一会就要执行它了。
优先级越低,过期时间越长,离当前时间越长,也就是过很久了才能轮到它执行。
lane
Lane用二进制位表示任务的优先级,方便优先级的计算,不同优先级占用不同位置的‘赛道’,而且存在批的概念,优先级越低,‘赛道’越多。高优先级打断低优先级,新建的任务需要赋予什么优先级等问题都是Lane所要解决的问题。
batchedUpdates
简单来说,在一个上下文中同时触发多次更新,这些更新会合并成一次更新,例如
onClick() {
  this.setState({ count: this.state.count + 1 });
  this.setState({ count: this.state.count + 1 });
}
在之前的react版本中如果脱离当前的上下文就不会被合并,例如把多次更新放在setTimeout中,原因是处于同一个context的多次setState的executionContext都会包含BatchedContext,包含BatchedContext的setState会合并,当executionContext等于NoContext,就会同步执行SyncCallbackQueue中的任务,所以setTimeout中的多次setState不会合并,而且会同步执行。
onClick() {
 setTimeout(() => {
    this.setState({ count: this.state.count + 1 });
    this.setState({ count: this.state.count + 1 });
  });
}
export function batchedUpdates<A, R>(fn: A => R, a: A): R {
  const prevExecutionContext = executionContext;
  executionContext |= BatchedContext;
  try {
    return fn(a);
  } finally {
    executionContext = prevExecutionContext;
    if (executionContext === NoContext) {
      resetRenderTimer();
       //executionContext为NoContext就同步执行SyncCallbackQueue中的任务
      flushSyncCallbackQueue();
    }
  }
}
在Concurrent mode下,上面的例子也会合并为一次更新,根本原因在如下一段简化的源码,如果多次setState,会比较这几次setState回调的优先级,如果优先级一致,则先return掉,不会进行后面的render阶段
function ensureRootIsScheduled(root: FiberRoot, currentTime: number) {
  const existingCallbackNode = root.callbackNode;//之前已经调用过的setState的回调
  //...
    if (existingCallbackNode !== null) {
    const existingCallbackPriority = root.callbackPriority;
    //新的setState的回调和之前setState的回调优先级相等 则进入batchedUpdate的逻辑
    if (existingCallbackPriority === newCallbackPriority) {
      return;
    }
    cancelCallback(existingCallbackNode);
  }
    //调度render阶段的起点
    newCallbackNode = scheduleCallback(
    schedulerPriorityLevel,
    performConcurrentWorkOnRoot.bind(null, root),
  );
    //...
}
那为什么在Concurrent mode下,在setTimeout回调多次setState优先级一致呢,因为在获取Lane的函数requestUpdateLane,只有第一次setState满足currentEventWipLanes === NoLanes,所以他们的currentEventWipLanes参数相同,而在findUpdateLane中schedulerLanePriority参数也相同(调度的优先级相同),所以返回的lane相同。
export function requestUpdateLane(fiber: Fiber): Lane {
    //...
  if (currentEventWipLanes === NoLanes) {//第一次setState满足currentEventWipLanes === NoLanes
    currentEventWipLanes = workInProgressRootIncludedLanes;
  }
  //...
  //在setTimeout中schedulerLanePriority, currentEventWipLanes都相同,所以返回的lane也相同
  lane = findUpdateLane(schedulerLanePriority, currentEventWipLanes);
  //...

  return lane;
}
Suspense
Suspense可以在请求数据的时候显示pending状态,请求成功后展示数据,原因是因为Suspense中组件的优先级很低,而离屏的fallback组件优先级高,当Suspense中组件resolve之后就会重新调度一次render阶段,此过程发生在updateSuspenseComponent函数中,具体可以看调试suspense的视频
总结
Fiber为concurrent架构提供了数据层面的支持。
Scheduler为concurrent实现时间片调度提供了保障。
Lane模型为concurrent提供了更新的策略
上层实现了batchedUpdates和Suspense
context
context流程图
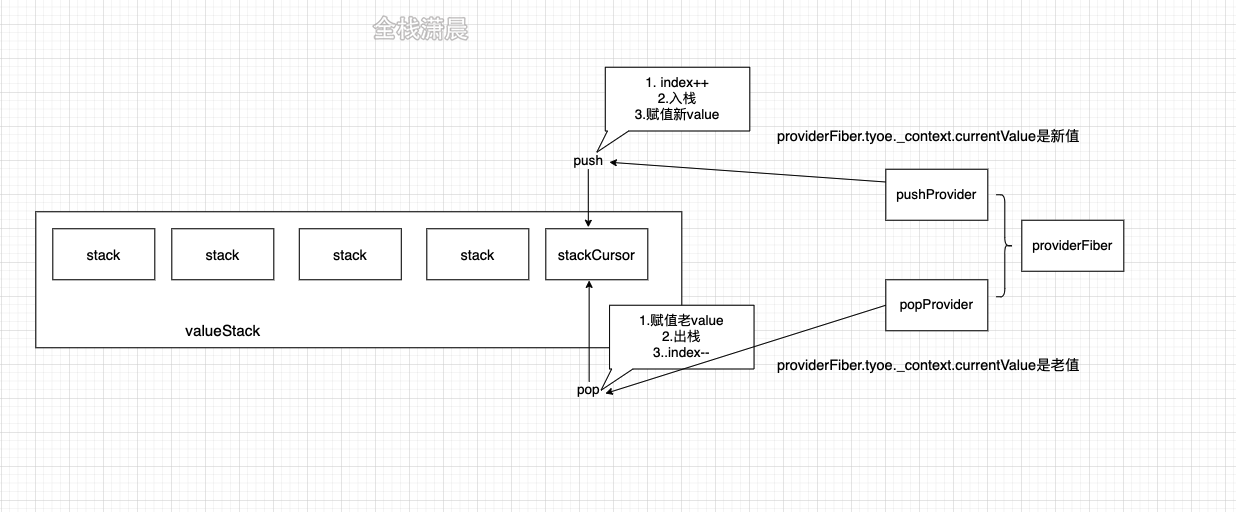
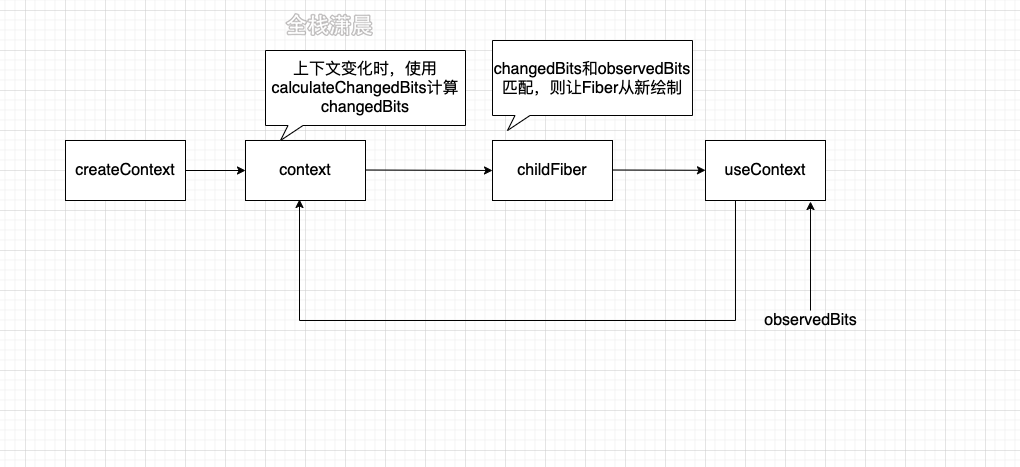
cursor/valueStack
react源码中存在一个valueStack和valueCursor用来记录context的历史信息和当前context,另外还有一个didPerformWorkStackCursor用来表示当前的context有没有变化
//ReactFiberNewContext.new.js
const valueCursor: StackCursor<mixed> = createCursor(null);
const didPerformWorkStackCursor: StackCursor<boolean> = createCursor(false);
//ReactFiberStack.new.js
const valueStack: Array<any> = [];
function pushProvider(providerFiber, nextValue) {
  var context = providerFiber.type._context;
  {
    push(valueCursor, context._currentValue, providerFiber);
    context._currentValue = nextValue;
  }
}
function popProvider(providerFiber) {
  var currentValue = valueCursor.current;
  pop(valueCursor, providerFiber);
  var context = providerFiber.type._context;

  {
    context._currentValue = currentValue;
  }
}
- 在render阶段调用updateContextProvider的时候会执行pushProvider,将新的值push进valueStack中
- 在commit阶段调用completeWork的时候会执行popProvider,将栈顶context pop出来,
为什么会有这样一个机制呢,因为我们的context是跨层级的,在之前讲到render阶段和commit阶段的时候,我们会以深度优先遍历的方式遍历节点,如果涉及跨层级读取状态就有点力不从心了,就需要一层一层往下传递我们的props,所以我们可以用一个stack记录我们的context,在render阶段pushProvider,在commit阶段popProvider,在每个具体的层级能根据valueCursor取当前value
createContext
export function createContext<T>(
  defaultValue: T,
  calculateChangedBits: ?(a: T, b: T) => number,
): ReactContext<T> {
  if (calculateChangedBits === undefined) {//可以传入计算bit的函数
    calculateChangedBits = null;
  } else {
    //...
  }

  const context: ReactContext<T> = {
    $$typeof: REACT_CONTEXT_TYPE,
    _calculateChangedBits: calculateChangedBits,//计算value变化的函数
    _currentValue: defaultValue,//dom环境的value
    _currentValue2: defaultValue,//art环境的value
    _threadCount: 0,
    Provider: (null: any),
    Consumer: (null: any),
  };

  context.Provider = {
    $$typeof: REACT_PROVIDER_TYPE,
    _context: context,
  };


  if (__DEV__) {

  } else {
    context.Consumer = context;
  }


  return context;
}

//示例
const NameChangedBits = 0b01;
const AgeChangedBits =  0b10;
const AppContext = createContext({}, (prevValue, nextValue) => {
  let result = 0;
  if (prevValue.name !== nextValue.name) {
    result |= NameChangedBits;
  };
  if (prevValue.age !== nextValue.age) {
    result |= AgeChangedBits;
  };
  return result;
});
在简化之后的createContext中可以看到,context和Provider、Consumer的关系是这样的:
context.Provider = {
    $$typeof: REACT_PROVIDER_TYPE,
    _context: context,
  };
context.Consumer = context;
useContext
useContext会调用readContext,readContext会创建dependce,加入当前fiber的dependencies链表中
function readContext(context, observedBits) {
  {
  if (lastContextWithAllBitsObserved === context) ; else if (observedBits === false || observedBits === 0) ; else {
    var resolvedObservedBits;

    //生成resolvedObservedBits
    if (typeof observedBits !== 'number' || observedBits === MAX_SIGNED_31_BIT_INT) {
      lastContextWithAllBitsObserved = context;
      resolvedObservedBits = MAX_SIGNED_31_BIT_INT;
    } else {
      resolvedObservedBits = observedBits;
    }

    var contextItem = {//生成dependce
      context: context,
      observedBits: resolvedObservedBits,
      next: null
    };

    if (lastContextDependency === null) {
      //...

      lastContextDependency = contextItem;
      currentlyRenderingFiber.dependencies = {//dependencies链表的第一个
        lanes: NoLanes,
        firstContext: contextItem,
        responders: null
      };
    } else {
      lastContextDependency = lastContextDependency.next = contextItem;//加入dependencies链表
    }
  }

  return  context._currentValue ;
}
provider/customer
在render阶段会调用updateContextProvider,注意几个关键的步骤
- pushProvider:将当前context加入valueStack
- calculateChangedBits:useContext可以设置observedBits,没有设置的话就是MAX_SIGNED_31_BIT_INT,也就是31位1,用于计算changedBits,这个计算context是否变化的过程就发生在calculateChangedBits函数中,用这样的方式可以提高context变化之后的性能
- bailoutOnAlreadyFinishedWork/propagateContextChange:如果changedBits没有改变则走bailoutOnAlreadyFinishedWork的逻辑,跳过当前节点的更新,如果改变则执行propagateContextChange
function updateContextProvider(current, workInProgress, renderLanes) {
  var providerType = workInProgress.type;
  var context = providerType._context;
  var newProps = workInProgress.pendingProps;
  var oldProps = workInProgress.memoizedProps;
  var newValue = newProps.value;

  //...

  pushProvider(workInProgress, newValue);

  if (oldProps !== null) {
    var oldValue = oldProps.value;
    var changedBits = calculateChangedBits(context, newValue, oldValue);

    if (changedBits === 0) {//context没有改变
      if (oldProps.children === newProps.children && !hasContextChanged()) {
        return bailoutOnAlreadyFinishedWork(current, workInProgress, renderLanes);
      }
    } else {//context改变了
      propagateContextChange(workInProgress, context, changedBits, renderLanes);
    }
  }

  var newChildren = newProps.children;
  reconcileChildren(current, workInProgress, newChildren, renderLanes);
  return workInProgress.child;
}
function calculateChangedBits(context, newValue, oldValue) {
  if (objectIs(oldValue, newValue)) {
        //没有改变
    return 0;
  } else {
    var changedBits = typeof context._calculateChangedBits === 'function' ? context._calculateChangedBits(oldValue, newValue) : MAX_SIGNED_31_BIT_INT;

    {
      if ((changedBits & MAX_SIGNED_31_BIT_INT) !== changedBits) {
        error('calculateChangedBits: Expected the return value to be a ' + '31-bit integer. Instead received: %s', changedBits);
      }
    }

    return changedBits | 0;
  }
}

//示例
const NameChangedBits = 0b01;
const AgeChangedBits = 0b10;
const AppContext = createContext({}, (prevValue, nextValue) => {
  let result = 0;
  if (prevValue.name !== nextValue.name) {
    result |= NameChangedBits;
  };
  if (prevValue.age !== nextValue.age) {
    result |= AgeChangedBits;
  };
  return result;
});
function propagateContextChange(workInProgress, context, changedBits, renderLanes) {
  var fiber = workInProgress.child;

  if (fiber !== null) {
    fiber.return = workInProgress;//fiber不存在 就找父节点
  }

  while (fiber !== null) {
    var nextFiber = void 0;//遍历fiber

    var list = fiber.dependencies;

    if (list !== null) {
      nextFiber = fiber.child;
      var dependency = list.firstContext;

      while (dependency !== null) {//遍历dependencies链表
        if (dependency.context === context && (dependency.observedBits & changedBits) !== 0) {
                    //有变化
          if (fiber.tag === ClassComponent) {
            //创建新的update
            var update = createUpdate(NoTimestamp, pickArbitraryLane(renderLanes));
            update.tag = ForceUpdate;
            enqueueUpdate(fiber, update);
          }

          fiber.lanes = mergeLanes(fiber.lanes, renderLanes);//合并优先级
          var alternate = fiber.alternate;

          if (alternate !== null) {
            alternate.lanes = mergeLanes(alternate.lanes, renderLanes);
          }

          scheduleWorkOnParentPath(fiber.return, renderLanes); //更新祖先节点的优先级

          list.lanes = mergeLanes(list.lanes, renderLanes);
          break;
        }

        dependency = dependency.next;
      }
    }
        //...
      nextFiber = fiber.sibling;
    } else {
      nextFiber = fiber.child;
    }
    //...

    fiber = nextFiber;
  }
}
updateContextConsumer关键的代码如下,执行prepareToReadContext判断优先级是否足够加入当前这次render,readContext取到当前context的value
function updateContextConsumer(current, workInProgress, renderLanes) {
  var context = workInProgress.type;
  //...
  prepareToReadContext(workInProgress, renderLanes);
  var newValue = readContext(context, newProps.unstable_observedBits);
  var newChildren;
  {
    ReactCurrentOwner$1.current = workInProgress;
    setIsRendering(true);
    newChildren = render(newValue);
    setIsRendering(false);
  }

    //...
  workInProgress.flags |= PerformedWork;
  reconcileChildren(current, workInProgress, newChildren, renderLanes);
  return workInProgress.child;
}
事件系统
从一个bug说起
下面这个demo_13在react17和react16中有什么不同吗?代码也很简单,模拟一个modal框,点击显示出现,点击其他地方,相当于点击了mask,modal消失,因为react事件都是委托到上层,所以需要在handleClick阻止冒泡,这样点击显示的时候不会触发document上的事件回调,导致modal无法显示。但是在react16上发现这样做还是不行,需要调用e.nativeEvent.stopImmediatePropagation()才能实现,而react17上没什么影响
究其原因就是react16和17在委托事件的容器上做出了改变,react16的事件会冒泡的document上,而17则会冒泡到root容器上,也就是ReactDom.render的第二个参数
export default class Demo13 extends React.Component {
  state = { show: false };
  componentDidMount() {
    document.addEventListener("click", () => {
      this.setState({ show: false });
    });
  }
  handleClick = (e) => {
    e.stopPropagation();//react17中生效
    // e.nativeEvent.stopImmediatePropagation(); //react16中生效 stopImmediatePropagation也阻止本级监听函数执行
    this.setState({ show: true });
  };
  render() {
    return (
      <div>
        <button onClick={this.handleClick}>显示</button>
        {this.state.show && <div onClick={(e) => e.nativeEvent.stopImmediatePropagation()}>modal</div>}
      </div>
    );
  }
}
大家也可以看下demo_11、demo_12在react16、17触发顺序有何差异,同时demo项目中的event.html也模拟了react16、17的事件代理机制
事件系统架构图
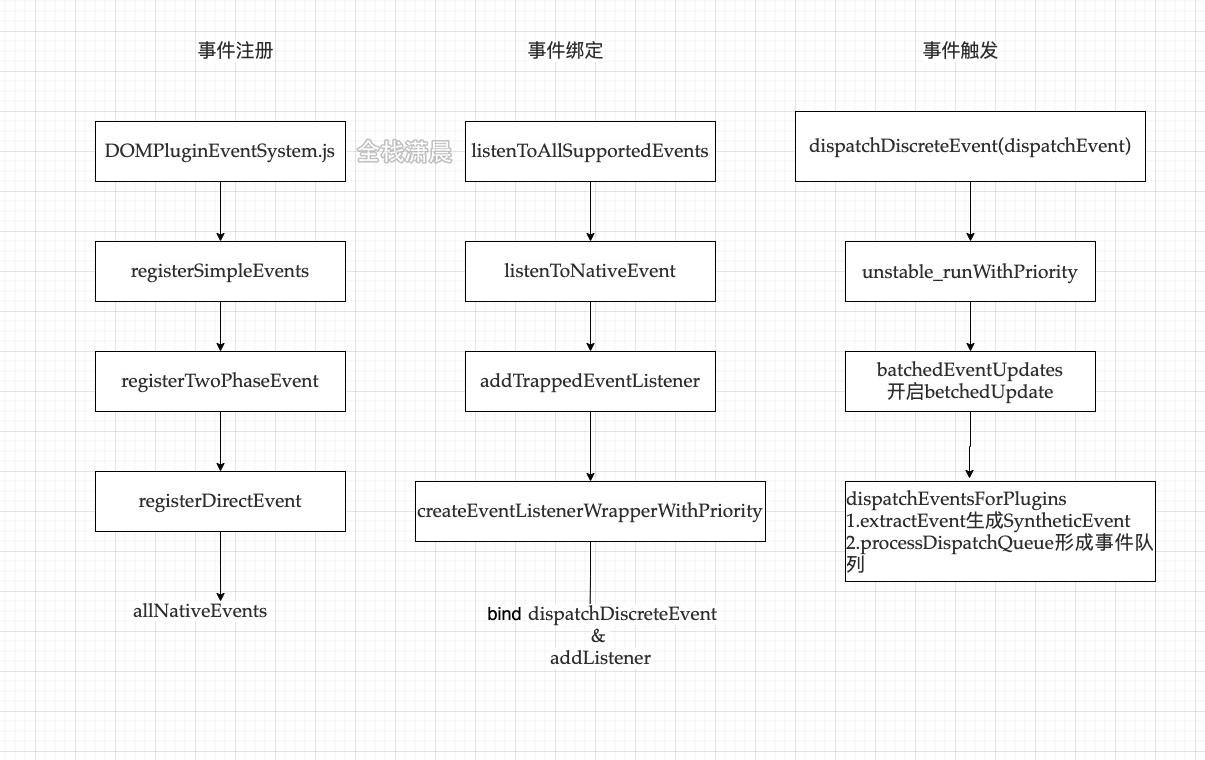
我们以SimpleEvent为例看事件注册、绑定和触发的过程,看视频的调试过程
事件注册
DOMPluginEventSystem.js会调用SimpleEventPlugin插件的registerEvents方法注册事件
//DOMPluginEventSystem.js
SimpleEventPlugin.registerEvents();
registerSimpleEvents
function registerSimpleEvents() {
  registerSimplePluginEventsAndSetTheirPriorities(discreteEventPairsForSimpleEventPlugin, DiscreteEvent);
  //...
}

function registerSimplePluginEventsAndSetTheirPriorities(eventTypes, priority) {
  for (var i = 0; i < eventTypes.length; i += 2) {
    var topEvent = eventTypes[i];
    var event = eventTypes[i + 1];
    var capitalizedEvent = event[0].toUpperCase() + event.slice(1);
    var reactName = 'on' + capitalizedEvent;
    eventPriorities.set(topEvent, priority);
    topLevelEventsToReactNames.set(topEvent, reactName);
    registerTwoPhaseEvent(reactName, [topEvent]);//注册捕获和冒泡两个阶段的事件
  }
}
registerTwoPhaseEvent
function registerTwoPhaseEvent(registrationName, dependencies) {
  registerDirectEvent(registrationName, dependencies);
  registerDirectEvent(registrationName + 'Capture', dependencies);
}
registerDirectEvent
function registerDirectEvent(registrationName, dependencies) {
 //...

  for (var i = 0; i < dependencies.length; i++) {
    allNativeEvents.add(dependencies[i]);//生成allNativeEvents对象
  }
}
事件绑定
listenToAllSupportedEvents
//由函数createRootImpl调用,也就是在创建根节点之后执行
function listenToAllSupportedEvents(rootContainerElement) {
    allNativeEvents.forEach(function (domEventName) {
      if (!nonDelegatedEvents.has(domEventName)) {
        listenToNativeEvent(domEventName, false, rootContainerElement, null);
      }

      listenToNativeEvent(domEventName, true, rootContainerElement, null);
    });
  }
}
listenToNativeEvent
function listenToNativeEvent(domEventName, isCapturePhaseListener, rootContainerElement, targetElement) {
 //...

  if (!listenerSet.has(listenerSetKey)) {
    if (isCapturePhaseListener) {
      eventSystemFlags |= IS_CAPTURE_PHASE;
    }

    addTrappedEventListener(target, domEventName, eventSystemFlags, isCapturePhaseListener);
    listenerSet.add(listenerSetKey);
  }
}
addTrappedEventListener
function addTrappedEventListener(targetContainer, domEventName, eventSystemFlags, isCapturePhaseListener, isDeferredListenerForLegacyFBSupport) {
  //创建具有优先级的监听函数
  var listener = createEventListenerWrapperWithPriority(targetContainer, domEventName, eventSystemFlags);
  //...
  targetContainer =  targetContainer;
  var unsubscribeListener;

  if (isCapturePhaseListener) {//节点上添加事件
    if (isPassiveListener !== undefined) {
      unsubscribeListener = addEventCaptureListenerWithPassiveFlag(targetContainer, domEventName, listener, isPassiveListener);
    } else {
      unsubscribeListener = addEventCaptureListener(targetContainer, domEventName, listener);
    }
  } else {
    if (isPassiveListener !== undefined) {
      unsubscribeListener = addEventBubbleListenerWithPassiveFlag(targetContainer, domEventName, listener, isPassiveListener);
    } else {
      unsubscribeListener = addEventBubbleListener(targetContainer, domEventName, listener);
    }
  }
}
createEventListenerWrapperWithPriority
function createEventListenerWrapperWithPriority(targetContainer, domEventName, eventSystemFlags) {
  var eventPriority = getEventPriorityForPluginSystem(domEventName);
  var listenerWrapper;

  switch (eventPriority) {
    case DiscreteEvent:
      listenerWrapper = dispatchDiscreteEvent;
      break;

    case UserBlockingEvent:
      listenerWrapper = dispatchUserBlockingUpdate;
      break;

    case ContinuousEvent:
    default:
      listenerWrapper = dispatchEvent;
      break;
  }
    //绑定dispatchDiscreteEvent
  return listenerWrapper.bind(null, domEventName, eventSystemFlags, targetContainer);
}
事件触发
dispatchDiscreteEvent(dispatchEvent)
function dispatchDiscreteEvent(domEventName, eventSystemFlags, container, nativeEvent) {
  {
    flushDiscreteUpdatesIfNeeded(nativeEvent.timeStamp);
  }

  discreteUpdates(dispatchEvent, domEventName, eventSystemFlags, container, nativeEvent);
}
unstable_runWithPriority
function unstable_runWithPriority(priorityLevel, eventHandler) {//eventHandler就是dispatchEvent函数
  switch (priorityLevel) {
    case ImmediatePriority:
    case UserBlockingPriority:
    case NormalPriority:
    case LowPriority:
    case IdlePriority:
      break;

    default:
      priorityLevel = NormalPriority;
  }

  var previousPriorityLevel = currentPriorityLevel;
  currentPriorityLevel = priorityLevel;

  try {
    return eventHandler();
  } finally {
    currentPriorityLevel = previousPriorityLevel;
  }
}
batchedEventUpdates
function batchedEventUpdates(fn, a, b) {
  if (isBatchingEventUpdates) {
    return fn(a, b);
  }

  isBatchingEventUpdates = true;

  try {
    return batchedEventUpdatesImpl(fn, a, b);
    //fn参数即:
    //function () {
    //  return dispatchEventsForPlugins(domEventName, eventSystemFlags, nativeEvent,                     //ancestorInst);
    //}
    function () {
    return dispatchEventsForPlugins(domEventName, eventSystemFlags, nativeEvent, ancestorInst);
  }
  } finally {
    isBatchingEventUpdates = false;
    finishEventHandler();
  }
}
dispatchEventsForPlugins
function dispatchEventsForPlugins(domEventName, eventSystemFlags, nativeEvent, targetInst, targetContainer) {
  var nativeEventTarget = getEventTarget(nativeEvent);
  var dispatchQueue = [];
  //extractEvent生成SyntheticEvent
  extractEvents(dispatchQueue, domEventName, targetInst, nativeEvent, nativeEventTarget, eventSystemFlags);
  //processDispatchQueue执行形成事件队列
  processDispatchQueue(dispatchQueue, eventSystemFlags);
}
手写miniReact
迷你react和真正的源码有哪些区别呢
- 在render阶段我们遍历了整颗Fiber树,在源码中如果节点什么都没改变会命中优化的逻辑,然后跳过这个节点的遍历
- commit我们也遍历了整颗Fiber树,源码中只遍历带有effect的Fiber节点,也就是遍历effectList
- 每次遍历的时候我们都是新建节点,源码中某些条件会复用节点
- 没有用到优先级
第一步:渲染器和入口函数
const React = {
  createElement,
  render,
};

const container = document.getElementById("root");

const updateValue = (e) => {
  rerender(e.target.value);
};

const rerender = (value) => {
  const element = (
    <div>
      <input onInput={updateValue} value={value} />
      <h2>Hello {value}</h2>
    </div>
  );
  React.render(element, container);
};

rerender("World");
第二步:创建dom节点函数
/创建element
function createElement(type, props, ...children) {
  return {
    type,
    props: {
      ...props,
      children: children.map((child) => (typeof child === "object" ? child : createTextElement(child))),
    },
  };
}

//创建text类型
function createTextElement(text) {
  return {
    type: "TEXT_ELEMENT",
    props: {
      nodeValue: text,
      children: [],
    },
  };
}

//创建dom
function createDom(fiber) {
  const dom = fiber.type === "TEXT_ELEMENT" ? document.createTextNode("") : document.createElement(fiber.type);

  updateDom(dom, {}, fiber.props);

  return dom;
}
第三步:更新节点函数
const isEvent = (key) => key.startsWith("on");
const isProperty = (key) => key !== "children" && !isEvent(key);
const isNew = (prev, next) => (key) => prev[key] !== next[key];
const isGone = (prev, next) => (key) => !(key in next);

//更新节点属性
function updateDom(dom, prevProps, nextProps) {
  //删除老的事件
  Object.keys(prevProps)
    .filter(isEvent)
    .filter((key) => !(key in nextProps) || isNew(prevProps, nextProps)(key))
    .forEach((name) => {
      const eventType = name.toLowerCase().substring(2);
      dom.removeEventListener(eventType, prevProps[name]);
    });

  // 删除旧属性
  Object.keys(prevProps)
    .filter(isProperty)
    .filter(isGone(prevProps, nextProps))
    .forEach((name) => {
      dom[name] = "";
    });

  // 设置新属性
  Object.keys(nextProps)
    .filter(isProperty)
    .filter(isNew(prevProps, nextProps))
    .forEach((name) => {
      dom[name] = nextProps[name];
    });

  // 增加新事件
  Object.keys(nextProps)
    .filter(isEvent)
    .filter(isNew(prevProps, nextProps))
    .forEach((name) => {
      const eventType = name.toLowerCase().substring(2);
      dom.addEventListener(eventType, nextProps[name]);
    });
}
第四步:render阶段
//render阶段
function performUnitOfWork(fiber) {
  if (!fiber.dom) {
    fiber.dom = createDom(fiber);
  }

  const elements = fiber.props.children;
  reconcileChildren(fiber, elements);

  if (fiber.child) {
    return fiber.child;
  }
  let nextFiber = fiber;
  while (nextFiber) {
    if (nextFiber.sibling) {
      return nextFiber.sibling;
    }
    nextFiber = nextFiber.parent;
  }
}

//调协节点
function reconcileChildren(wipFiber, elements) {
  let index = 0;
  let oldFiber = wipFiber.alternate && wipFiber.alternate.child;
  let prevSibling = null;
  while (index < elements.length || (oldFiber !== null && oldFiber !== undefined)) {
    const element = elements[index];
    let newFiber = null;

    const sameType = oldFiber && element && element.type === oldFiber.type;

    if (sameType) {
      newFiber = {
        type: oldFiber.type,
        props: element.props,
        dom: oldFiber.dom,
        parent: wipFiber,
        alternate: oldFiber,
        effectTag: "UPDATE",
      };
    }
    if (element && !sameType) {
      newFiber = {
        type: element.type,
        props: element.props,
        dom: null,
        parent: wipFiber,
        alternate: null,
        effectTag: "PLACEMENT",
      };
    }
    if (oldFiber && !sameType) {
      oldFiber.effectTag = "DELETION";
      deletions.push(oldFiber);
    }

    if (oldFiber) {
      oldFiber = oldFiber.sibling;
    }

    if (index === 0) {
      wipFiber.child = newFiber;
    } else if (element) {
      prevSibling.sibling = newFiber;
    }
    prevSibling = newFiber;
    index++;
  }
}
第五步:commit阶段
//commit阶段
function commitRoot() {
  deletions.forEach(commitWork);
  commitWork(wipRoot.child);
  currentRoot = wipRoot;
  wipRoot = null;
}

//操作真实dom
function commitWork(fiber) {
  if (!fiber) {
    return;
  }

  const domParent = fiber.parent.dom;
  if (fiber.effectTag === "PLACEMENT" && fiber.dom !== null) {
    domParent.appendChild(fiber.dom);
  } else if (fiber.effectTag === "UPDATE" && fiber.dom !== null) {
    updateDom(fiber.dom, fiber.alternate.props, fiber.props);
  } else if (fiber.effectTag === "DELETION") {
    domParent.removeChild(fiber.dom);
  }

  commitWork(fiber.child);
  commitWork(fiber.sibling);
}
第六步:开始调度
//渲染开始的入口
function render(element, container) {
  wipRoot = {
    dom: container,
    props: {
      children: [element],
    },
    alternate: currentRoot,
  };
  deletions = [];
  nextUnitOfWork = wipRoot;
}

//调度函数
function workLoop(deadline) {
  let shouldYield = false;
  while (nextUnitOfWork && !shouldYield) {
    //render阶段
    nextUnitOfWork = performUnitOfWork(nextUnitOfWork);
    shouldYield = deadline.timeRemaining() < 1;
  }

  if (!nextUnitOfWork && wipRoot) {
    commitRoot(); //commit阶段
  }

  requestIdleCallback(workLoop); //空闲调度
}

requestIdleCallback(workLoop);
完整代码
//创建element
function createElement(type, props, ...children) {
  return {
    type,
    props: {
      ...props,
      children: children.map((child) => (typeof child === "object" ? child : createTextElement(child))),
    },
  };
}

//创建text类型
function createTextElement(text) {
  return {
    type: "TEXT_ELEMENT",
    props: {
      nodeValue: text,
      children: [],
    },
  };
}

//创建dom
function createDom(fiber) {
  const dom = fiber.type === "TEXT_ELEMENT" ? document.createTextNode("") : document.createElement(fiber.type);

  updateDom(dom, {}, fiber.props);

  return dom;
}

const isEvent = (key) => key.startsWith("on");
const isProperty = (key) => key !== "children" && !isEvent(key);
const isNew = (prev, next) => (key) => prev[key] !== next[key];
const isGone = (prev, next) => (key) => !(key in next);

//更新节点属性
function updateDom(dom, prevProps, nextProps) {
  //删除老的事件
  Object.keys(prevProps)
    .filter(isEvent)
    .filter((key) => !(key in nextProps) || isNew(prevProps, nextProps)(key))
    .forEach((name) => {
      const eventType = name.toLowerCase().substring(2);
      dom.removeEventListener(eventType, prevProps[name]);
    });

  // 删除旧属性
  Object.keys(prevProps)
    .filter(isProperty)
    .filter(isGone(prevProps, nextProps))
    .forEach((name) => {
      dom[name] = "";
    });

  // 设置新属性
  Object.keys(nextProps)
    .filter(isProperty)
    .filter(isNew(prevProps, nextProps))
    .forEach((name) => {
      dom[name] = nextProps[name];
    });

  // 增加新事件
  Object.keys(nextProps)
    .filter(isEvent)
    .filter(isNew(prevProps, nextProps))
    .forEach((name) => {
      const eventType = name.toLowerCase().substring(2);
      dom.addEventListener(eventType, nextProps[name]);
    });
}

//commit阶段
function commitRoot() {
  deletions.forEach(commitWork);
  commitWork(wipRoot.child);
  currentRoot = wipRoot;
  wipRoot = null;
}

//操作真实dom
function commitWork(fiber) {
  if (!fiber) {
    return;
  }

  const domParent = fiber.parent.dom;
  if (fiber.effectTag === "PLACEMENT" && fiber.dom !== null) {
    domParent.appendChild(fiber.dom);
  } else if (fiber.effectTag === "UPDATE" && fiber.dom !== null) {
    updateDom(fiber.dom, fiber.alternate.props, fiber.props);
  } else if (fiber.effectTag === "DELETION") {
    domParent.removeChild(fiber.dom);
  }

  commitWork(fiber.child);
  commitWork(fiber.sibling);
}

let nextUnitOfWork = null;
let currentRoot = null;
let wipRoot = null;
let deletions = null;

//渲染开始的入口
function render(element, container) {
  wipRoot = {
    dom: container,
    props: {
      children: [element],
    },
    alternate: currentRoot,
  };
  deletions = [];
  nextUnitOfWork = wipRoot;
}

//调度函数
function workLoop(deadline) {
  let shouldYield = false;
  while (nextUnitOfWork && !shouldYield) {
    //render阶段
    nextUnitOfWork = performUnitOfWork(nextUnitOfWork);
    shouldYield = deadline.timeRemaining() < 1;
  }

  if (!nextUnitOfWork && wipRoot) {
    commitRoot(); //commit阶段
  }

  requestIdleCallback(workLoop); //空闲调度
}

requestIdleCallback(workLoop);

//render阶段
function performUnitOfWork(fiber) {
  if (!fiber.dom) {
    fiber.dom = createDom(fiber);
  }

  const elements = fiber.props.children;
  reconcileChildren(fiber, elements);

  if (fiber.child) {
    return fiber.child;
  }
  let nextFiber = fiber;
  while (nextFiber) {
    if (nextFiber.sibling) {
      return nextFiber.sibling;
    }
    nextFiber = nextFiber.parent;
  }
}

//调协节点
function reconcileChildren(wipFiber, elements) {
  let index = 0;
  let oldFiber = wipFiber.alternate && wipFiber.alternate.child;
  let prevSibling = null;
  while (index < elements.length || (oldFiber !== null && oldFiber !== undefined)) {
    const element = elements[index];
    let newFiber = null;

    const sameType = oldFiber && element && element.type === oldFiber.type;

    if (sameType) {
      newFiber = {
        type: oldFiber.type,
        props: element.props,
        dom: oldFiber.dom,
        parent: wipFiber,
        alternate: oldFiber,
        effectTag: "UPDATE",
      };
    }
    if (element && !sameType) {
      newFiber = {
        type: element.type,
        props: element.props,
        dom: null,
        parent: wipFiber,
        alternate: null,
        effectTag: "PLACEMENT",
      };
    }
    if (oldFiber && !sameType) {
      oldFiber.effectTag = "DELETION";
      deletions.push(oldFiber);
    }

    if (oldFiber) {
      oldFiber = oldFiber.sibling;
    }

    if (index === 0) {
      wipFiber.child = newFiber;
    } else if (element) {
      prevSibling.sibling = newFiber;
    }
    prevSibling = newFiber;
    index++;
  }
}

const React = {
  createElement,
  render,
};

const container = document.getElementById("root");

const updateValue = (e) => {
  rerender(e.target.value);
};

const rerender = (value) => {
  const element = (
    <div>
      <input onInput={updateValue} value={value} />
      <h2>Hello {value}</h2>
    </div>
  );
  React.render(element, container);
};

rerender("World");
常见面试问题
至此我们介绍了react的理念,如果解决cpu和io的瓶颈,关键是实现异步可中断的更新
我们介绍了react源码架构(ui=fn(state)),从scheduler开始调度(根据过期事件判断优先级),经过render阶段的深度优先遍历形成effectList(中间会执行reconcile|diff),交给commit处理真实节点(中间穿插生命周期和部分hooks),而这些调度的过程都离不开Fiber的支撑,Fiber是工作单元,也是节点优先级、更新UpdateQueue、节点信息的载体,Fiber双缓存则提供了对比前后节点更新的基础。我们还介绍了jsx是React.createElement的语法糖。Lane模型则提供了更细粒度的优先级对比和计算,这一切都为concurrent mode提供了基础,在这之上变可以实现Suspense和batchedUpdate(16、17版本实现的逻辑不一样),18章context的valueStack和valueCursor在整个架构中运行机制,19章介绍了新版事件系统,包括事件生产、监听和触发
面试题简答(详见视频源码角度讲解)
jsx和Fiber有什么关系
答:mount时通过jsx对象(调用createElement的结果)调用createFiberFromElement生成Fiber update时通过reconcileChildFibers或reconcileChildrenArray对比新jsx和老的Fiber(current Fiber)生成新的wip Fiber树
react17之前jsx文件为什么要声明import React from 'react',之后为什么不需要了
答:jsx经过编译之后编程React.createElement,不引入React就会报错,react17改变了编译方式,变成了jsx.createElement
function App() {
  return <h1>Hello World</h1>;
}
//转换后
import {jsx as _jsx} from 'react/jsx-runtime';

function App() {
  return _jsx('h1', { children: 'Hello world' });
}
Fiber是什么,它为什么能提高性能
答:Fiber是一个js对象,能承载节点信息、优先级、updateQueue,同时它还是一个工作单元。
- Fiber双缓存可以在构建好wip Fiber树之后切换成current Fiber,内存中直接一次性切换,提高了性能
- Fiber的存在使异步可中断的更新成为了可能,作为工作单元,可以在时间片内执行工作,没时间了交还执行权给浏览器,下次时间片继续执行之前暂停之后返回的Fiber
- Fiber可以在reconcile的时候进行相应的diff更新,让最后的更新应用在真实节点上
hooks
为什么hooks不能写在条件判断中
答:hook会按顺序存储在链表中,如果写在条件判断中,就没法保持链表的顺序
状态/生命周期
setState是同步的还是异步的
答:legacy模式下:命中batchedUpdates时是异步 未命中batchedUpdates时是同步的
concurrent模式下:都是异步的
componentWillMount、componentWillMount、componentWillUpdate为什么标记UNSAFE
答:新的Fiber架构能在scheduler的调度下实现暂停继续,排列优先级,Lane模型能使Fiber节点具有优先级,在高优先级的任务打断低优先级的任务时,低优先级的更新可能会被跳过,所有以上生命周期可能会被执行多次,和之前版本的行为不一致。
组件
react元素$$typeof属性什么
答:用来表示元素的类型,是一个symbol类型
react怎么区分Class组件和Function组件
答:Class组件prototype上有isReactComponent属性
函数组件和类组件的相同点和不同点
答:相同点:都可以接收props返回react元素
不同点:
编程思想:类组件需要创建实例,面向对象,函数组件不需要创建实例,接收输入,返回输出,函数式编程
内存占用:类组建需要创建并保存实例,占用一定的内存
值捕获特性:函数组件具有值捕获的特性 下面的函数组件换成类组件打印的num一样吗
export default function App() {
  const [num, setNum] = useState(0);
  const click = () => {
    setTimeout(() => {
      console.log(num);
    }, 3000);
    setNum(num + 1);
  };

  return <div onClick={click}>click {num}</div>;
}


export default class App extends React.Component {
  state = {
    num: 0
  };

  click = () => {
    setTimeout(() => {
      console.log(this.state.num);
    }, 3000);
    this.setState({ num: this.state.num + 1 });
  };

  render() {
    return <div onClick={this.click}>click {this.state.num}</div>;
  }
}
可测试性:函数组件方便测试
状态:类组件有自己的状态,函数组件没有只能通过useState
生命周期:类组件有完整生命周期,函数组件没有可以使用useEffect实现类似的生命周期
逻辑复用:类组件继承 Hoc(逻辑混乱 嵌套),组合优于继承,函数组件hook逻辑复用
跳过更新:shouldComponentUpdate PureComponent,React.memo
发展未来:函数组件将成为主流,屏蔽this、规范、复用,适合时间分片和渲染
开放性问题
说说你对react的理解/请说一下react的渲染过程
答:是什么:react是构建用户界面的js库
能干什么:可以用组件化的方式构建快速响应的web应用程序
如何干:声明式(jsx) 组件化(方便拆分和复用 高内聚 低耦合) 一次学习随处编写
做的怎么样: 优缺(社区繁荣 一次学习随处编写 api简介)缺点(没有系统解决方案 选型成本高 过于灵活)
设计理念:跨平台(虚拟dom) 快速响应(异步可中断 增量更新)
性能瓶颈:cpu io fiber时间片 concurrent mode
渲染过程:scheduler render commit Fiber架构
聊聊react生命周期 详见第11章
简述diff算法 详见第9章
react有哪些优化手段
答:shouldComponentUpdate、不可变数据结构、列表key、pureComponent、react.memo、useEffect依赖项、useCallback、useMemo、bailoutOnAlreadyFinishedWork ...
react为什么引入jsx
答:jsx声明式 虚拟dom跨平台
解释概念:jsx是js语法的扩展 可以很好的描述ui jsx是React.createElement的语法糖
想实现什么目的:声明式 代码结构简洁 可读性强 结构样式和事件可以实现高内聚 低耦合 、复用和组合 不需要引入新的概念和语法 只写js, 虚拟dom跨平
有哪些可选方案:模版语法 vue ag引入了控制器 作用域 服务等概念
jsx原理:babel抽象语法树 classic是老的转换 automatic新的转换
说说virtual Dom的理解
答:是什么:React.createElement函数返回的就是虚拟dom,用js对象描述真实dom的js对象
优点:处理了浏览器的兼容性 防范xss攻击 跨平台 差异化更新 减少更新的dom操作
缺点:额外的内存 初次渲染不一定快
你对合成事件的理解
类型 原生事件 合成事件 命名方式 全小写 小驼峰 事件处理函数 字符串 函数对象 阻止默认行为 返回false event.preventDefault() 理解:
- React把事件委托到document上(v17是container节点上)
- 先处理原生事件 冒泡到document上在处理react事件
- React事件绑定发生在reconcile阶段 会在原生事件绑定前执行
优势:
- 进行了浏览器兼容。顶层事件代理,能保证冒泡一致性(混合使用会出现混乱)
- 默认批量更新
- 避免事件对象频繁创建和回收,react引入事件池,在事件池中获取和释放对象(react17中废弃) react17事件绑定在容器上了
- 我们写的事件是绑定在
dom上么,如果不是绑定在哪里? 答:v16绑定在document上,v17绑定在container上 - 为什么我们的事件手动绑定
this(不是箭头函数的情况) 答:合成事件监听函数在执行的时候会丢失上下文 - 为什么不能用
return false来阻止事件的默认行为? 答:说到底还是合成事件和原生事件触发时机不一样 react怎么通过dom元素,找到与之对应的fiber对象的? 答:通过internalInstanceKey对应
解释结果和现象
点击Father组件的div,Child会打印Child吗
function Child() {
  console.log('Child');
  return <div>Child</div>;
}


function Father(props) {
  const [num, setNum] = React.useState(0);
  return (
    <div onClick={() => {setNum(num + 1)}}>
      {num}
      {props.children}
    </div>
  );
}


function App() {
  return (
    <Father>
      <Child/>
    </Father>
  );
}

const rootEl = document.querySelector("#root");
ReactDOM.render(<App/>, rootEl);
答: 不会,源码中是否命中bailoutOnAlreadyFinishedWork
打印顺序是什么
function Child() {
  useEffect(() => {
    console.log('Child');
  }, [])
  return <h1>child</h1>;
}

function Father() {
  useEffect(() => {
    console.log('Father');
  }, [])

  return <Child/>;
}

function App() {
  useEffect(() => {
    console.log('App');
  }, [])

  return <Father/>;
}
答:Child ,Father ,App ,render阶段mount时深度优先遍历,commit阶段useEffect执行时机
useLayout/componentDidMount和useEffect的区别是什么
class App extends React.Component {
  componentDidMount() {
    console.log('mount');
  }
}

useEffect(() => {
  console.log('useEffect');
}, [])
答:他们在commit阶段不同时机执行,useEffect在commit阶段结尾异步调用,useLayout/componentDidMount同步调用
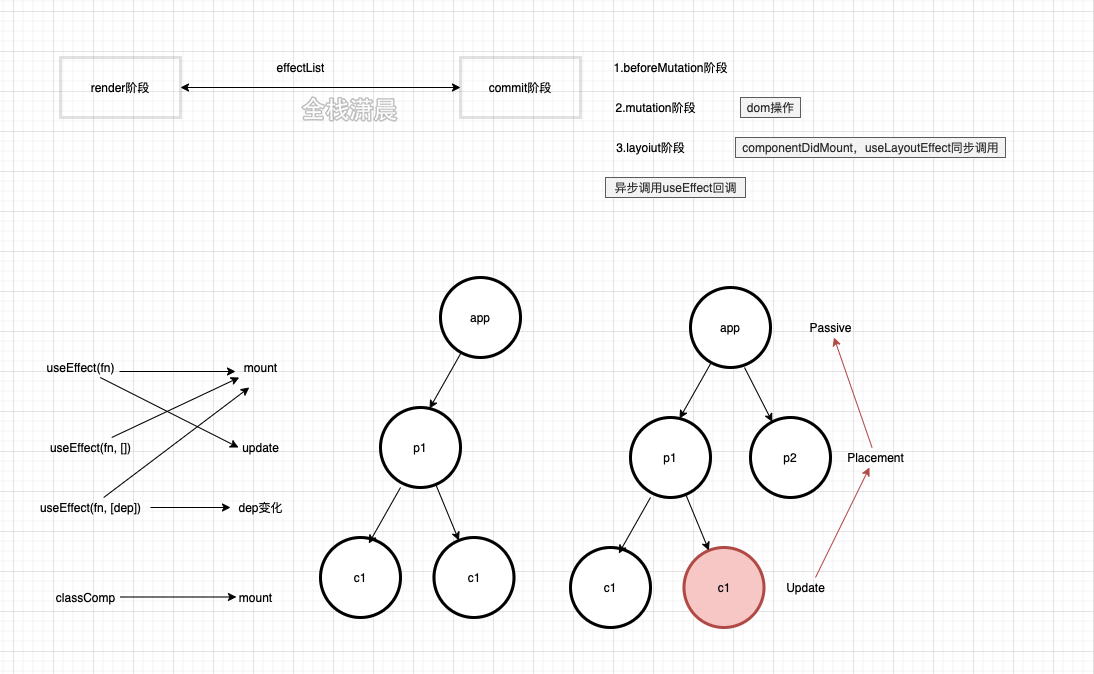
如何解释demo_4、demo_8、demo_9出现的现象
答:demo_4:useEffect和useLayoutEffect的区别 demo_8:任务的优先级有关,见源码分析视频 demo_9:批量更新有关,见源码分析视频